I’ve had my Vista PC running for quite some months now without problems, as well as Adobe Acrobat Professional and Adobe Photoshop. But not anymore…
Yesterday I plugged in the Zune that I bought on a trip to the US in january. I got the installer / driver software from zune.net. During the installation the installer requested me to update my Zune firmware, which I did. Everything went smooth.
I then left my PC for some hours to go to work. When I got back I was shown a dialog saying that my hardware configuration had changed and that I needed to reactivate Vista, hmmm. I tried the automatic activation but it said my key was already in use. After calling the automatic activation service phone number I got Vista reactivated, weird stuff.
Then suddenly Adobe Acrobat said that my current license was invalid and that I had to reactivate the software. I had to do this twice as I got the exact same message the next time I started Acrobat:
And now today I just started Photoshop, and Guess what came up:
Did me plugging in my Zune cause all of this? I have not made any other hardware changes for months, but how in the world would plugging in an MP3 player cause such a mess?
If you have ever deployed .NET windows applications, you have without doubt tried the Visual Studio Install project type. The Install project will create .MSI install applications for you, they’re great for basic installations, but nothing more than that. The .NET bootstrapper is quite lacking, at times it won’t be able to find the framework download file as it’s changed it’s location, at other times it’s not able to download it. And finally, if it does determine that the user needs the framework, it’s shown in an ugly uncustomizable GUI.
I’ve looked for an alternative, I’d prefer not to pay for using some of the well established installers such as Wise, InstallShield, ActiveInstall and so forth. What I found is a remnant of WinAmp, the NSIS (Nullsoft Scriptable Install System) project.
NSIS is both free and open source and it’s very much community driven. There are a plethora of plugins available for all sorts of different tasks, and of course you can write your own plugins for special needs.
I won’t delve too deeply into why you should choose NSIS over any of the competitors, instead I’ll show you a step by step guide of how to create an NSIS installer that bootstraps the .NET 2.0 framework as well as running custom install and uninstall actions in .NET code.
Let’s first create the simple application that we will be installing. It doesn’t really matter what it is, in this example I’ve made a single Windows Forms Application:
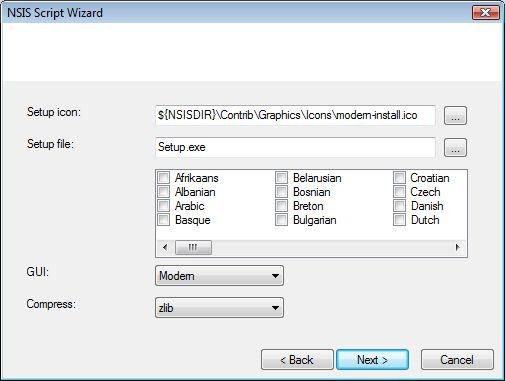
Now let’s start up HMNE. Click File -> New Script From Wizard. Fill in the relevant application date on the first page.
You may choose a custom icon for the installer, the default icon is an NSIS standard icon. You can also choose the resulting installation files name as well as it’s output location. If no location is specified, it will be outputted to the location that contains our script file. A great feature of NSIS is that it’s got localized versions for a lot of different languages built in, simply select the languages that the user should be able to select and the installer will automatically be localized. You can choose a couple of different GUIs, I personally prefer the Modern one. As for compression, in my tests the LZMA compression works the best, though compression time and CPU usage might be a factor for very large projects.
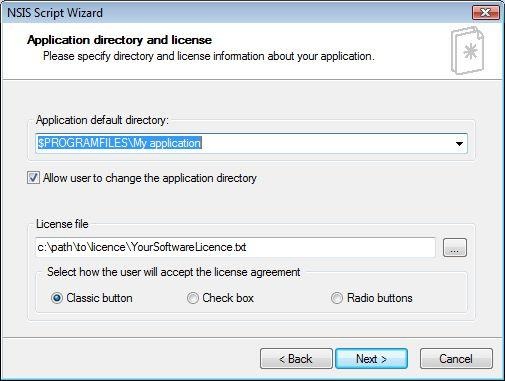
Now you specify where you want your application to be installed, notice the general use of variables like $PROGRAMFILES, $NSISDIR, $INSTDIR and so forth. You can also optionally choose a license file that the user must accept to continue the installation.
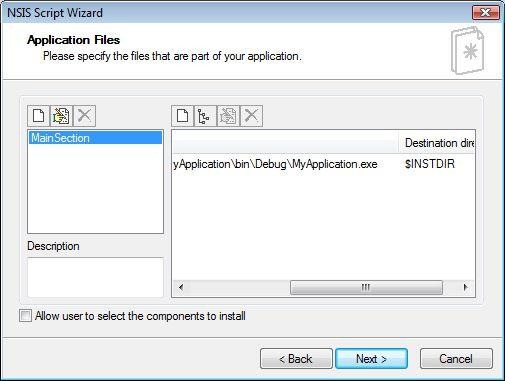
Now you can setup the actual files that will be installed as part of the project. You cannot select a whole project output as you can in the Visual Studio Install project, instead you must manually select the files that should be installed, usually from the Debug/Release directories of your project(s).
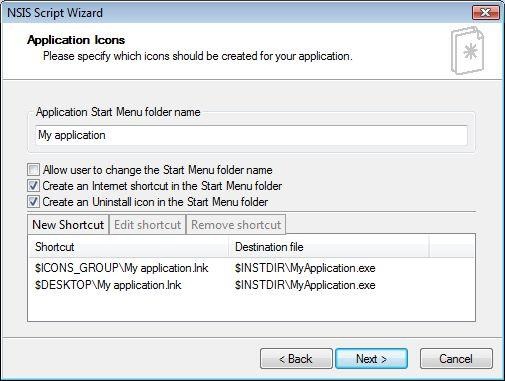
Optionally you can select which links you want to be placed in the application program group in the start menu, if such one should be created at all.
When the installation is done, the user can choose to view the Readme file and/or start the application - that is, if you specify an application and/or a readme file.
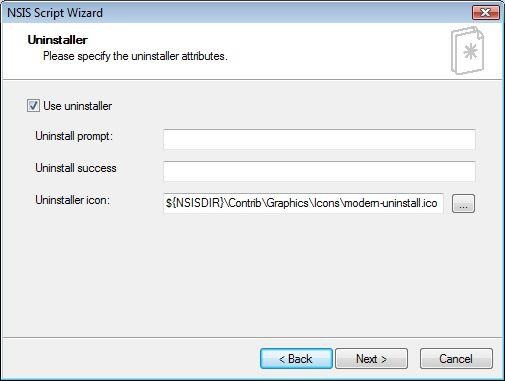
Finally we can choose to include an uninstaller, as well as specifying our custom uninstallation confirmation and report texts. If no custom text is specified, the default texts will be used.
When the wizard finishes, make sure to click “Save script” and “Convert file paths to relative paths”.
Finally the install script is made and ready to run. Press Ctrl+9 to compile the script. If everything succeeds, you’ll see the Setup.exe file in the same directory as the one where you saved the install script. I will not be going over the various commands and settings that are being set in the script, for that I strongly recommend the excellent built in help documents, as well as the WinAmp NSIS forums. Instead I’ll focus on how to bootstrap the .NET Framework 2.0 and how to run custom install and uninstall actions.
Add these three lines to the top of your nsi file, they include some functions that we will need:
Add this line right above the .onInit function, it makes a variable (untyped) that’ll contain a Yes/No value, depending on whether we need to install the .NET Framework or not.
Var InstallDotNET
Now modify the .onInit function so it matches the below, as well as adding the GetDotNETVersion function. First we ask the user what language they want to continue in (!insertmacro MUI_LANGDLL_DISPLAY). After that we initialize the InstallDotNET variable to “No”. Depending on the result of the GetDotNETVersion we tell the user that we need to install the framework, either because the user does not have the framework at all, or because the version is less than 2.0. We won’t actually install the framework yet, we’ll just remember whether we have to or not.
Function .onInit
!insertmacro MUI_LANGDLL_DISPLAY
; Check .NET version
StrCpy $InstallDotNET"No"
Call GetDotNETVersion
Pop $0${If}$0 == "not found"
StrCpy $InstallDotNET"Yes"
MessageBox MB_OK|MB_ICONINFORMATION "${PRODUCT_NAME} requires that the .NET Framework 2.0 is installed. The .NET Framework will be downloaded and installed automatically during installation of ${PRODUCT_NAME}."
Return
${EndIf}
StrCpy $0$0""1# skip "v"${VersionCompare}$0"2.0"$1${If}$1 == 2
StrCpy $InstallDotNET"Yes"
MessageBox MB_OK|MB_ICONINFORMATION "${PRODUCT_NAME} requires that the .NET Framework 2.0 is installed. The .NET Framework will be downloaded and installed automatically during installation of ${PRODUCT_NAME}."
Return
${EndIf}
FunctionEnd
Function GetDotNETVersion
Push $0
Push $1
System::Call "mscoree::GetCORVersion(w .r0, i ${NSIS_MAX_STRLEN}, *i) i .r1"
StrCmp $1"error"0 +2
StrCpy $0"not found"
Pop $1
Exch $0
FunctionEnd
Now find the “MainSection” section (depending on what you called it in the wizard).
Modify the section so it looks like the below. Your file names and amount may vary, the primary part of our concern is the first part. It will test whether the $InstallDotNET variable implies that we have to install the framework. If it does, it’ll hide the usual GUI elements of the installer and start the download of the .NET Framework from any URL you specify, this could be the official download URL or a location you host yourself. If the user cancels the download we’ll delete the half-finished file and abort. Otherwise we’ll execute the dotnetfx.exe file and wait for it to complete (hence we’ll now have the .NET Framework 2.0). After having installed the framework we delete the dotnetfx.exe file again. Finally we show the GUI again.
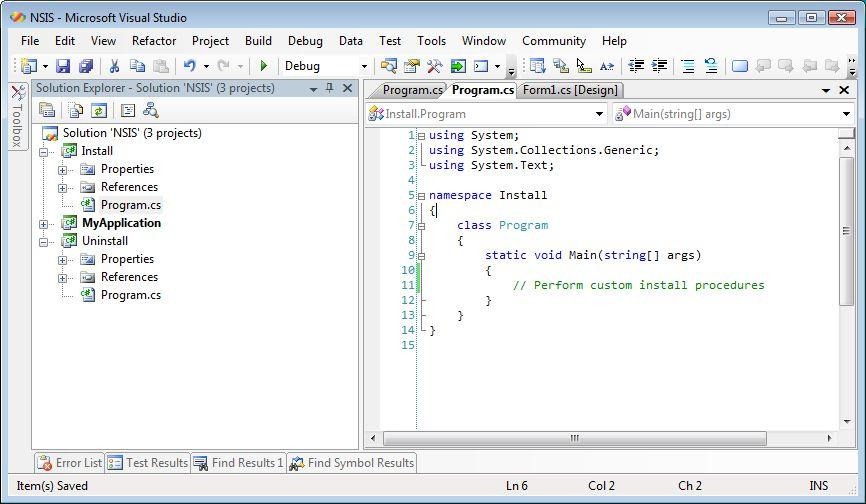
Now comes the part where I’ll introduce our custom .NET install and uninstall actions. Create two new Console Application projects in the solution called Uninstall and Install, like the following:
Add the below function to your code, it’ll run the Install.exe file after the installation has successfully completed:
Function .onInstSuccess
         ExecWait "$InstDirInstall.exe"
FunctionEnd
Locate the “Section Uninstall” part and add the following line as the very first:
ExecWait "$InstDirUninstall.exe"
Make sure to add both Install.exe and Uninstall.exe to the list of files that will be installed, in the Main Section. It will run the Uninstall.exe application before anything else, and wait for it to finish before continuing. After it’s done we’ll delete all the installed files, including the Install and Uninstall.exe applications - remember to add those to file deletions manually, following the syntax of the other file deletions.
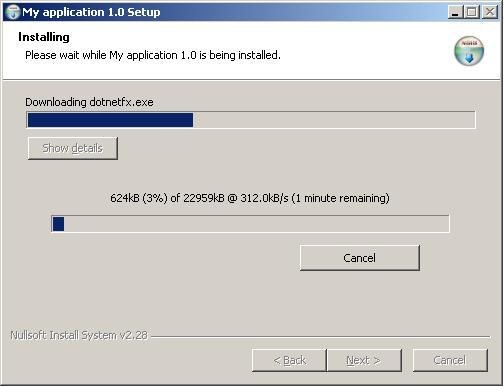
Now press Ctrl+9 to build the installer, and look at it run in all of its awesomeness:
After having downloaded the .NET Framework 2.0, it’ll start the .NET installer and run it through as usual, the installation will continue as soon as the .NET installer finishes. There is currently no check for whether the user cancels the .NET installation midways or if it fails. A simple check could be made right afterwards by simple calling the GetDotNETVersion function again like we did just before, if it fails, the user hasn’t installed .NET for some unknown reason and we’ll have to abort.
In Photoshop we often work with multiple windows open. They can be cascaded to more easily be able to view the different windows and tell them apart. There’s an API function that does the same to any windows you specify, you can even define the rectangle where they should be cascaded within.
using System;
using System.Runtime.InteropServices;
using System.Drawing;
using System.Collections;
namespace Cascading_Windows
{
class Program
{
// The CascadeWindows function cascades the specified child windows of the specified parent window. It can be used to// cascade all windows (as in this example) or just the child windows of a specific window by passing in a handle to that// window. You can also define the rectangle wherein they should be cascaded.// See http://msdn.microsoft.com/library/default.asp?url=/library/en-us/winui/winui/windowsuserinterface/windowing/windows/windowreference/windowfunctions/animatewindow.asp// for full documentation.
[DllImport("user32.dll")]
publicstaticexternintCascadeWindows(int hWnd, int wHow, ref Rectangle lpRect, int cKids, ref ArrayList lpKids);
staticvoid Main(string[] args)
{
// As the function expects references to both a Rectangle and an ArrayList, we'll have to hack a couple of null values// as we can't pass null into the function.
Rectangle nilRect = Rectangle.Empty;
ArrayList nilList = null;
// Cascade all windows that are children of the Desktop (handle = 0).
CascadeWindows(0, 0, ref nilRect, 0, ref nilList);
Console.Read();
}
}
}
And the result:
Having three monitors generates quite a large screenshot so I’ll leave this one up for you to try / your imagination :)
Let’s be a bit more graphic. This time I’ll show you how to use the Windows API to make your forms fade in/out, slide in from the side or do various other animations. For this example we’ll have to use a Windows Forms project as we have to utilize a Form object in the example.
using System;
using System.Collections.Generic;
using System.ComponentModel;
using System.Data;
using System.Drawing;
using System.Text;
using System.Windows.Forms;
using System.Runtime.InteropServices;
namespace Animating_windows
{
publicpartialclass Form1 : Form
{
// The possible AW flags for use with the AnimateWindow function.publicenum AW : int
{
SLIDE = 262144,
ACTIVATE = 131072,
BLEND = 524288,
HIDE = 65536,
CENTER = 16,
HOR_POSITIVE = 1,
HOR_NEGATIVE = 2,
VER_POSITIVE = 4,
VER_NEGATIVE = 8
}
// The AnimateWindow function enables you to produce special effects when showing or hiding windows. The hWnd parameter// is the handle to the window - note that this window HAS to be in the same thread as the thread calling the AnimateWindow// function - thus the windows project so we have a Form to experiment with. The time flag is the duration of the// animation, and finally the flags parameter sets the type of animation to perform.// See http://msdn.microsoft.com/library/default.asp?url=/library/en-us/winui/winui/windowsuserinterface/windowing/windows/windowreference/windowfunctions/animatewindow.asp// for full documentation.
[DllImport("user32.dll")]
publicstaticexternboolAnimateWindow(IntPtr hWnd, int time, int flags);
publicForm1()
{
InitializeComponent();
}
privatevoidForm1_Load(object sender, EventArgs e)
{
// Fade in the form over a period of 3 seconds.
AnimateWindow(this.Handle, 3000, (int)AW.BLEND);
// Hide the form so we can perform the next animation.this.Hide();
// Make the window expand outward.
AnimateWindow(this.Handle, 3000, (int)AW.CENTER);
// And collapse inward...
AnimateWindow(this.Handle, 3000, (int)AW.CENTER | (int)AW.HIDE);
// Let's slide in the form from the left side to the right.
AnimateWindow(this.Handle, 3000, (int)AW.SLIDE | (int)AW.HOR_POSITIVE);
}
}
}
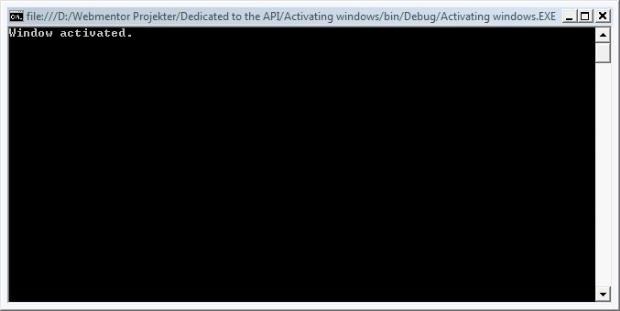
Now we’ll see how to activate windows and sending them to the foreground. I will be using the WindowFinder class that I introduced in the blog Finding specific windows.
using System;
using System.Runtime.InteropServices;
using System.Text.RegularExpressions;
namespace Activating_windows
{
class Program
{
// This enumeration holds all the possible values that can be passed onto the ShowWindow function.publicenum SW : int
{
HIDE = 0,
SHOWNORMAL = 1,
SHOWMINIMIZED = 2,
SHOWMAXIMIZED = 3,
SHOWNOACTIVATE = 4,
SHOW = 5,
MINIMIZE = 6,
SHOWMINNOACTIVE = 7,
SHOWNA = 8,
RESTORE = 9,
SHOWDEFAULT = 10
}
// The SetForegroundWindow will activate the window, setting the window thread to the foreground thread, as// well as activating keyboard input for the specified window.
[DllImport("user32.dll")]
publicstaticexternlongSetForegroundWindow(int hWnd);
// The ShowWindow function can do the same as SetForegroundWindow, but it gives much greater control// over what happens, by customizing the parameters sent through the cmd parameter.
[DllImport("user32.dll")]
publicstaticexternboolShowWindow(int hWnd, int cmd);
staticvoid Main(string[] args)
{
// Introduced in the "Finding specific windows" blog, we use the WindowFinder class to find all Internet Explorer main window instances.
Finding_specific_windows.WindowFinder wf = new Finding_specific_windows.WindowFinder();
wf.FindWindows(0, null, new Regex("- (Windows|Microsoft) Internet Explorer"), new Regex("iexplore"), new Finding_specific_windows.WindowFinder.FoundWindowCallback(foundWindow));
Console.Read();
}
staticbool foundWindow(int handle)
{
// We'll activate the window by calling the SetForegroundWindow function, passing in the handle to the window.
SetForegroundWindow(handle);
// Calling the ShowWindow function with the SHOWNA parameter will put the window in the foreground,// but it won't be activated.
ShowWindow(handle, (int)SW.SHOWNA);
Console.WriteLine("Window activated.");
returnfalse;
}
}
}
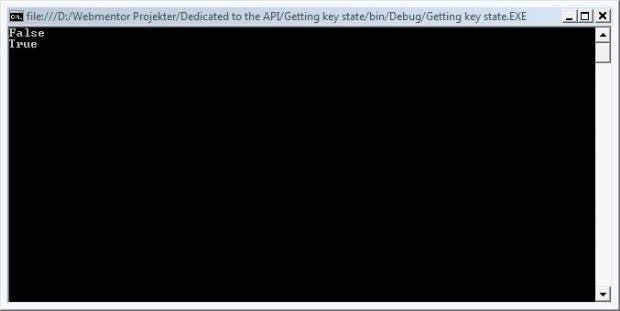
Here’s an example of how to retrieve the state of any keyboard key.
using System;
using System.Runtime.InteropServices;
namespace Getting_key_state
{
class Program
{
// The GetAsyncKeyState takes a virtual key code as the nVirtKey parameter. It then checks on the state of// this key (down/up). The return code is either zero for up or any non-zero value for pressed,// thus it's easiest to convert the result to a boolean and use that result.
[DllImport("user32.dll")]
publicstaticexternshortGetAsyncKeyState(int nVirtKey);
// These are all the possible values in the VK enumeration. It covers most of the special buttons on a keyboard.// See http://msdn.microsoft.com/library/default.asp?url=/library/en-us/winui/winui/WindowsUserInterface/UserInput/VirtualKeyCodes.asp// for full documentation.publicenum VK : int
{
NUMPAD7 = 0x67,
NUMPAD8 = 0x68,
NUMPAD9 = 0x69,
MULTIPLY = 0x6A,
ADD = 0x6B,
SEPARATOR = 0x6C,
SUBTRACT = 0x6D,
DECIMAL = 0x6E,
DIVIDE = 0x6F,
F1 = 0x70,
F2 = 0x71,
F3 = 0x72,
F4 = 0x73,
F5 = 0x74,
F6 = 0x75,
F7 = 0x76,
F8 = 0x77,
F9 = 0x78,
F10 = 0x79,
F11 = 0x7A,
F12 = 0x7B,
NUMLOCK = 0x90,
SCROLL = 0x91,
LSHIFT = 0xA0,
RSHIFT = 0xA1,
LCONTROL = 0xA2,
RCONTROL = 0xA3,
LMENU = 0xA4,
RMENU = 0xA5,
BACK = 0x08,
TAB = 0x09,
RETURN = 0x0D,
SHIFT = 0x10,
CONTROL = 0x11,
MENU = 0x12,
PAUSE = 0x13,
CAPITAL = 0x14,
ESCAPE = 0x1B,
SPACE = 0x20,
END = 0x23,
HOME = 0x24,
LEFT = 0x25,
UP = 0x26,
RIGHT = 0x27,
DOWN = 0x28,
PRINT = 0x2A,
SNAPSHOT = 0x2C,
INSERT = 0x2D,
DELETE = 0x2E,
LWIN = 0x5B,
RWIN = 0x5C,
NUMPAD0 = 0x60,
NUMPAD1 = 0x61,
NUMPAD2 = 0x62,
NUMPAD3 = 0x63,
NUMPAD4 = 0x64,
NUMPAD5 = 0x65,
NUMPAD6 = 0x66,
A = 0x41,
B = 0x42,
C = 0x43,
D = 0x44,
E = 0x45,
F = 0x46,
G = 0x47,
H = 0x48,
I = 0x49,
J = 0x4A,
K = 0x4B,
L = 0x4C,
M = 0x4D,
N = 0x4E,
O = 0x4F,
P = 0x50,
Q = 0x51,
R = 0x52,
S = 0x53,
T = 0x54,
U = 0x55,
V = 0x56,
W = 0x57,
X = 0x58,
Y = 0x59,
Z = 0x5A
}
staticvoid Main(string[] args)
{
// We'll call GetAsyncKeyState passing in the A keycode as a parameter.
Console.WriteLine(Convert.ToBoolean(GetAsyncKeyState((int)VK.A)));
// And then we'll pass the shift keycode as a control check.
Console.WriteLine(Convert.ToBoolean(GetAsyncKeyState((int)VK.SHIFT)));
Console.ReadLine();
}
}
}
using System;
using System.Collections.Generic;
using System.Text;
using System.Runtime.InteropServices;
using System.Text.RegularExpressions;
namespace Minimizing_and_maximizing_windows
{
class Program
{
// The ShowWindowAsync method alters the windows show state through the nCmdShow parameter.// The nCmdShow parameter can have any of the SW values.// See http://msdn.microsoft.com/library/en-us/winui/winui/windowsuserinterface/windowing/windows/windowreference/windowfunctions/showwindowasync.asp// for full documentation.
[DllImport("user32.dll")]
publicstaticexternboolShowWindowAsync(int hWnd, int nCmdShow);
// An enumeration containing all the possible SW values.publicenum SW : int
{
HIDE = 0,
SHOWNORMAL = 1,
SHOWMINIMIZED = 2,
SHOWMAXIMIZED = 3,
SHOWNOACTIVATE = 4,
SHOW = 5,
MINIMIZE = 6,
SHOWMINNOACTIVE = 7,
SHOWNA = 8,
RESTORE = 9,
SHOWDEFAULT = 10
}
staticvoid Main(string[] args)
{
// Introduced in the "Finding specific windows" blog, we use the WindowFinder class to find all Internet Explorer main window instances.
Finding_specific_windows.WindowFinder wf = new Finding_specific_windows.WindowFinder();
wf.FindWindows(0, null, new Regex("- (Windows|Microsoft) Internet Explorer"), new Regex("iexplore"), new Finding_specific_windows.WindowFinder.FoundWindowCallback(foundWindow));
Console.Read();
}
staticbool foundWindow(int handle)
{
// After an Internet Explorer window has been found, randomly either maximize or minimize it.if (new Random().Next(0, 2) == 0)
{
// Maximize the window.
ShowWindowAsync(handle, (int)SW.SHOWMAXIMIZED);
Console.WriteLine("Window maximized");
}
else
{
// Minimize the window.
ShowWindowAsync(handle, (int)SW.MINIMIZE);
Console.WriteLine("Window minimized");
}
// Since we return true, this will be done for any and all Internet Explorer instances.returntrue;
}
}
}
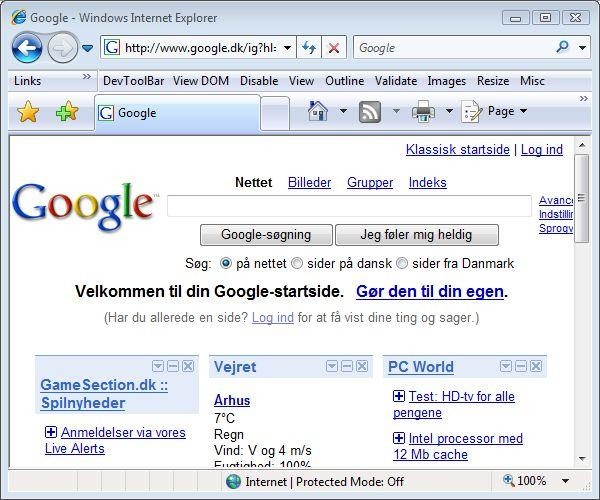
Last time we saw how to obtain a windows location and size. This time I’ll show how to change a windows size and location. I will be using the WindowFinder class that I introduced in the blog Finding specific windows.
using System;
using System.Collections.Generic;
using System.Text;
using System.Runtime.InteropServices;
using System.Text.RegularExpressions;
using System.Drawing;
namespace Modifying_window_location_and_size
{
class Program
{
// The SetWindowPos function is used to both resize and change the location of windows. The uFlags parameter// can take any number of flags, with zero being a neutral flag, the same goes for the hWndInsertAfter parameter.// X, Y is the new location of the window, cx and cy is the new height / width of the window. Via uFlags it can// be set to ignore the new location and/or the new size of the window.// See http://msdn2.microsoft.com/en-us/library/ms633545.aspx for full documentation.
[DllImport("user32.dll")]
publicstaticexternboolSetWindowPos(int hWnd, int hWndInsertAfter, int X, int Y, int cx, int cy, uint uFlags);
// An enumeration containing all the possible HWND values.publicenum HWND : int
{
BOTTOM = 1,
NOTOPMOST = -2,
TOPMOST = -1,
TOP = 0
}
// And enumeration containing all the possible SWP values.publicenum SWP : uint
{
ASYNCWINDOWPOS = 0x4000,
DEFERERASE = 0x2000,
FRAMECHANGED = 0x0020,
HIDEWINDOW = 0x0080,
NOACTIVATE = 0x0010,
NOCOPYBITS = 0x0100,
NOMOVE = 0x0002,
NOOWNERZORDER = 0x0200,
NOREDRAW = 0x0008,
NOSENDCHANGING = 0x0400,
NOSIZE = 0x0001,
NOZORDER = 0x0004,
SHOWWINDOW = 0x0040
}
staticvoid Main(string[] args)
{
// Introduced in the "Finding specific windows" blog, we use the WindowFinder class to find all Internet Explorer main window instances.
Finding_specific_windows.WindowFinder wf = new Finding_specific_windows.WindowFinder();
wf.FindWindows(0, null, new Regex("- (Windows|Microsoft) Internet Explorer"), new Regex("iexplore"), new Finding_specific_windows.WindowFinder.FoundWindowCallback(foundWindow));
Console.Read();
}
staticbool foundWindow(int handle)
{
// After an Internet Explorer window has been found, relocate it to (50,50) and set it's size to 600x500px.
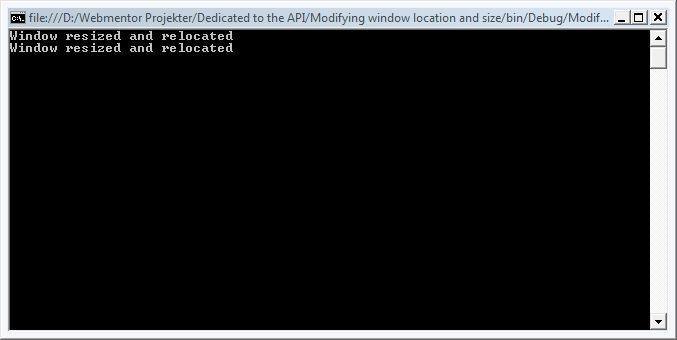
SetWindowPos(handle, 0, 50, 50, 600, 500, 0);
Console.WriteLine("Window resized and relocated");
// Since we return true, this will be done for any and all Internet Explorer instances.returntrue;
}
}
}
Note that the location is not in relation to it’s parent windows location, it is always the absolute screen position.
using System.Runtime.InteropServices;
using System.Drawing;
using System.Text.RegularExpressions;
using System;
using System.Text;
using System.Globalization;
namespace Getting_window_location_and_size
{
class Program
{
// Win32 constants.constint WM_GETTEXT = 0x000D;
constint WM_GETTEXTLENGTH = 0x000E;
// Win32 functions that have all been used in previous blogs.
[DllImport("User32.Dll")]
privatestaticexternvoidGetClassName(int hWnd, StringBuilder s, int nMaxCount);
[DllImport("User32.dll")]
privatestaticextern Int32 SendMessage(int hWnd, int Msg, int wParam, StringBuilder lParam);
[DllImport("User32.dll")]
privatestaticextern Int32 SendMessage(int hWnd, int Msg, int wParam, int lParam);
// The GetWindowRect function takes a handle to the window as the first parameter. The second parameter// must include a reference to a Rectangle object. This Rectangle object will then have it's values set// to the window rectangle properties.
[DllImport("user32.dll")]
publicstaticexternlongGetWindowRect(int hWnd, ref Rectangle lpRect);
staticvoid Main(string[] args)
{
// Introduced in the "Finding specific windows" blog, we use the WindowFinder class to find all Internet Explorer main window instances.
Finding_specific_windows.WindowFinder wf = new Finding_specific_windows.WindowFinder();
wf.FindWindows(0, null, new Regex("- (Windows|Microsoft) Internet Explorer"), new Regex("iexplore"), new Finding_specific_windows.WindowFinder.FoundWindowCallback(foundWindow));
Console.Read();
}
staticbool foundWindow(int handle)
{
// First we intialize an empty Rectangle object.
Rectangle rect = new Rectangle();
// Then we call the GetWindowRect function, passing in a reference to the rect object.
GetWindowRect(handle, ref rect);
// And then we get the resulting rectangle. The tricky part here is that this rectangle includes// not only the location of the window, but also the size, but not in the form we're used to.
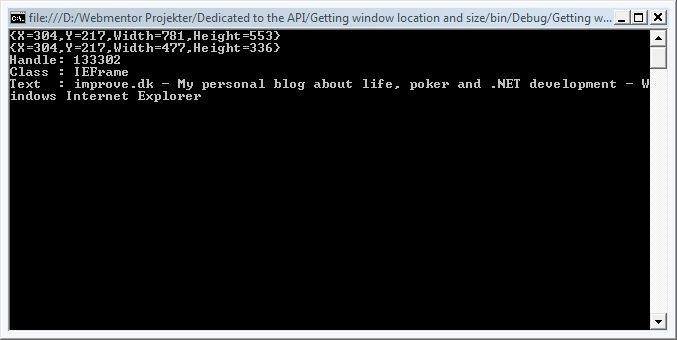
Console.WriteLine(rect.ToString());
// If the window is 100 x 100 pixels and is located at (10,10), then the rectangle would look like this:// rect.X = 10;// rect.Y = 10;// rect.Width = 110;// rect.Height = 110;// We simply have to subtract the rect.X value from the rect.Width value to obtain the "real" width of// the window, similarly we have to subtract the Y value from the Height value to obtain the real height.// After this we have the real window properties through the X, Y, Width and Height values.
rect.Width = rect.Width - rect.X;
rect.Height = rect.Height - rect.Y;
// Lets print the rectangle after we've fixed it so we can confirm it's correct.
Console.WriteLine(rect.ToString());
// As used earlier, we print the basic properties of the window.
printWindowInfo(handle);
returntrue;
}
// Prints basic properties of a window, uses function already used in previous blogs.privatestaticvoidprintWindowInfo(int handle)
{
// Get the class.
StringBuilder sbClass = new StringBuilder(256);
GetClassName(handle, sbClass, sbClass.Capacity);
// Get the text.int txtLength = SendMessage(handle, WM_GETTEXTLENGTH, 0, 0);
StringBuilder sbText = new StringBuilder(txtLength + 1);
SendMessage(handle, WM_GETTEXT, sbText.Capacity, sbText);
// Now we can write out the information we have on the window.
Console.WriteLine("Handle: " + handle);
Console.WriteLine("Class : " + sbClass);
Console.WriteLine("Text : " + sbText);
Console.WriteLine();
}
}
}
Last time I made an example of how to enumerate windows. This time I present to you a class that greatly simplifies the process of searching for specific windows, types of windows, windows belonging to a specific process, having a specific text. You can search for any number of these parameters at the same time, using regular expressions for all string matches to provide optimal flexibility.
using System.Runtime.InteropServices;
using System;
using System.Text;
using System.Text.RegularExpressions;
using System.Diagnostics;
namespace Searching_for_windows
{
class Program
{
// Win32 constants.constint WM_GETTEXT = 0x000D;
constint WM_GETTEXTLENGTH = 0x000E;
// Win32 functions that have all been used in previous blogs.
[DllImport("User32.Dll")]
privatestaticexternvoidGetClassName(int hWnd, StringBuilder s, int nMaxCount);
[DllImport("User32.dll")]
privatestaticexternintGetWindowText(int hWnd, StringBuilder text, int count);
[DllImport("User32.dll")]
privatestaticextern Int32 SendMessage(int hWnd, int Msg, int wParam, StringBuilder lParam);
[DllImport("User32.dll")]
privatestaticextern Int32 SendMessage(int hWnd, int Msg, int wParam, int lParam);
// Main entrypoint functionstaticvoid Main(string[] args)
{
WindowFinder wf = new WindowFinder();
// Find all Internet Explorer instances
wf.FindWindows(0, null, null, new Regex("iexplore"), new WindowFinder.FoundWindowCallback(foundWindow));
// Find all visual studio instances
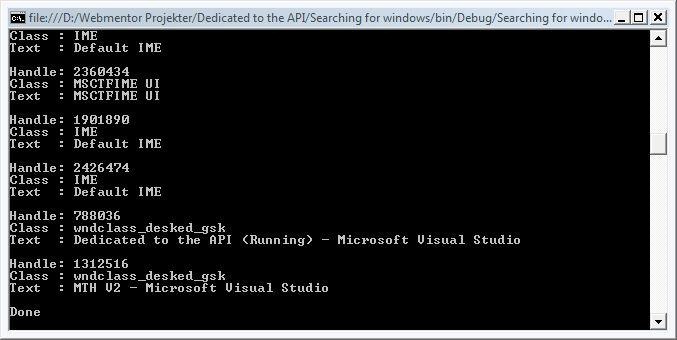
wf.FindWindows(0, null, new Regex(" - Microsoft Visual Studio"), new Regex("devenv"), new WindowFinder.FoundWindowCallback(foundWindow));
Console.WriteLine("Done");
Console.Read();
}
// Gets called each time a window is found by the WindowFinder class.privatestaticboolfoundWindow(int handle)
{
// Print the window info.
printWindowInfo(handle);
// Continue on with next window.returntrue;
}
// Prints basic properties of a window, uses function already used in previous blogs.privatestaticvoidprintWindowInfo(int handle)
{
// Get the class.
StringBuilder sbClass = new StringBuilder(256);
GetClassName(handle, sbClass, sbClass.Capacity);
// Get the text.int txtLength = SendMessage(handle, WM_GETTEXTLENGTH, 0, 0);
StringBuilder sbText = new StringBuilder(txtLength + 1);
SendMessage(handle, WM_GETTEXT, sbText.Capacity, sbText);
// Now we can write out the information we have on the window.
Console.WriteLine("Handle: " + handle);
Console.WriteLine("Class : " + sbClass);
Console.WriteLine("Text : " + sbText);
Console.WriteLine();
}
}
///<summary>/// A class used for finding windows based upon their class, title, process and parent window handle.///</summary>publicclass WindowFinder
{
// Win32 constants.constint WM_GETTEXT = 0x000D;
constint WM_GETTEXTLENGTH = 0x000E;
// Win32 functions that have all been used in previous blogs.
[DllImport("User32.Dll")]
privatestaticexternvoidGetClassName(int hWnd, StringBuilder s, int nMaxCount);
[DllImport("User32.dll")]
privatestaticexternintGetWindowText(int hWnd, StringBuilder text, int count);
[DllImport("User32.dll")]
privatestaticextern Int32 SendMessage(int hWnd, int Msg, int wParam, StringBuilder lParam);
[DllImport("User32.dll")]
privatestaticextern Int32 SendMessage(int hWnd, int Msg, int wParam, int lParam);
[DllImport("user32")]
privatestaticexternintGetWindowThreadProcessId(int hWnd, outint lpdwProcessId);
// EnumChildWindows works just like EnumWindows, except we can provide a parameter that specifies the parent// window handle. If this is NULL or zero, it works just like EnumWindows. Otherwise it'll only return windows// whose parent window handle matches the hWndParent parameter.
[DllImport("user32.Dll")]
privatestaticextern Boolean EnumChildWindows(int hWndParent, PChildCallBack lpEnumFunc, int lParam);
// The PChildCallBack delegate that we used with EnumWindows.privatedelegateboolPChildCallBack(int hWnd, int lParam);
// This is an event that is run each time a window was found that matches the search criterias. The boolean// return value of the delegate matches the functionality of the PChildCallBack delegate function.privateevent FoundWindowCallback foundWindow;
publicdelegateboolFoundWindowCallback(int hWnd);
// Members that'll hold the search criterias while searching.privateint parentHandle;
private Regex className;
private Regex windowText;
private Regex process;
// The main search function of the WindowFinder class. The parentHandle parameter is optional, taking in a zero if omitted.// The className can be null as well, in this case the class name will not be searched. For the window text we can input// a Regex object that will be matched to the window text, unless it's null. The process parameter can be null as well,// otherwise it'll match on the process name (Internet Explorer = "iexplore"). Finally we take the FoundWindowCallback// function that'll be called each time a suitable window has been found.publicvoidFindWindows(int parentHandle, Regex className, Regex windowText, Regex process, FoundWindowCallback fwc)
{
this.parentHandle = parentHandle;
this.className = className;
this.windowText = windowText;
this.process = process;
// Add the FounWindowCallback to the foundWindow event.
foundWindow = fwc;
// Invoke the EnumChildWindows function.
EnumChildWindows(parentHandle, new PChildCallBack(enumChildWindowsCallback), 0);
}
// This function gets called each time a window is found by the EnumChildWindows function. The foun windows here// are NOT the final found windows as the only filtering done by EnumChildWindows is on the parent window handle.privateboolenumChildWindowsCallback(int handle, int lParam)
{
// If a class name was provided, check to see if it matches the window.if (className != null)
{
StringBuilder sbClass = new StringBuilder(256);
GetClassName(handle, sbClass, sbClass.Capacity);
// If it does not match, return true so we can continue on with the next window.if (!className.IsMatch(sbClass.ToString()))
returntrue;
}
// If a window text was provided, check to see if it matches the window.if (windowText != null)
{
int txtLength = SendMessage(handle, WM_GETTEXTLENGTH, 0, 0);
StringBuilder sbText = new StringBuilder(txtLength + 1);
SendMessage(handle, WM_GETTEXT, sbText.Capacity, sbText);
// If it does not match, return true so we can continue on with the next window.if (!windowText.IsMatch(sbText.ToString()))
returntrue;
}
// If a process name was provided, check to see if it matches the window.if (process != null)
{
int processID;
GetWindowThreadProcessId(handle, out processID);
// Now that we have the process ID, we can use the built in .NET function to obtain a process object.
Process p = Process.GetProcessById(processID);
// If it does not match, return true so we can continue on with the next window.if (!process.IsMatch(p.ProcessName))
returntrue;
}
// If we get to this point, the window is a match. Now invoke the foundWindow event and based upon// the return value, whether we should continue to search for windows.return foundWindow(handle);
}
}
}