SQL Server stores all of it’s data in what is basically a large array of “pages”. Each page is exactly 8kb and can contain various kinds of data, depending on the page type. In this entry we’ll explore how to decipher a data page.
As mentioned, all data in SQL Server is stored in pages, this includes data, index data and various other page types (GAM/SGAM/IAM/PFS etc) to support the operations of SQL Server. Each page type has a unique page content and will thus require separate analysis to understand their content. In this entry I’ll concentrate on a normal data page, that is, the pages that contain the data of either heap tables or clustered indexes.
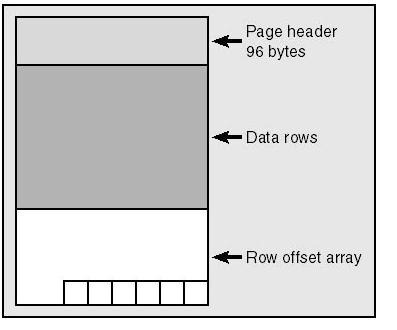
A page has a basic structure consisting of a header, the actual page content and finally an array noting the locations of the individual rows in the content section.
First of all, we need to create a new empty database for this to work:
CREATE DATABASE Test
To make it easier to reset & redo the examples, you should start a new transaction by running “BEGIN TRAN” as the first command (I’m assuming you’re running these queries in SSMS). When you want to reset / start over, just run “ROLLBACK” and nothing will be saved.
First we will look at the structure of data pages for a heap table. We’ll create a simple table containing only a single int (identity) field:
CREATE TABLE tmp
(
	ID int identity(1,1)
)
Now, let’s insert 2 rows into the table:
INSERT INTO tmp DEFAULT VALUES
GO 2
If you do a SELECT on the tmp table at this point, you should get two rows with values 1-2 in the ID column. At this point we want to retrieve a list of the pages used to store the contents of the tmp table. We can do this by using the undocumented DBCC IND command:
DBCC IND(Test, tmp, -1)
The first parameter is the database name, Test in our case. The next parameter is the name of the table, while the last parameter is an index ID - using -1 as the ID will return all indexes, which is fine in our case. Running the above command should yield a result like the one below:

The only two important columns at this point are the PagePID, IAMPID and PageType columns. PagePID is the unique (within this database file) page ID for a specific page. IAMPID defines a parent/child relationship between pages. PageType defines the type of page that we’re looking at. The most common page types you’ll run into are:
- 1 - Data page
- 2 - Index page
- 3/4 - Text pages
- 8 - GAM page
- 9 - SGAM page
- 10 - IAM page
- 11 - PFS page
At this point we’re interested in the root IAM (page type = 10) page with page ID 119. This is the root page of our heap table index. This is the page that currently tracks all of the data pages belonging to the tmp table. Currently there’s only one IAM page, but if necessary, there can be multiple nested IAM pages to support more data pages than can be referenced on a single IAM page.
The root page has a NULL IAMPID, signaling that it doesn’t have any parent pages. The second page has an IAMPID of 119 - the ID of the root page. Thus the second page is a child page of the root page. We can also see that the second page is a data page since it’s page type is = 1. Notice the page ID of the second page, as both the root and child page ID’s will most likely be different in your test!
Before we can retrieve the contents of the page, we have to turn on a specific trace flag, otherwise we won’t see any results of the following command, as they’re sent only to the error log by default:
DBCC TRACEON(3604)
After the trace flag has been turned on, we’re ready to run the undocumented DBCC PAGE command. The DBCC PAGE command takes four parameters, the first one being the database name. The second is the file number in the database - this will be 1 since there’s only a single file per database by default. The third parameter is the page ID we want to analyze - notice that this varies and will most likely be different in your situation. The final parameter defines the level of detail (0-3) to be included in the output. The most common levels are 0 and 1, 0 outputting only the header values while 1 also includes the actual row data.
DBCC PAGE(Test, 1, 1839, 1)
The result should resemble the following:
PAGE: (1:119)

BUFFER:

BUF @0x0000000080FF0980

bpage = 0x0000000080C26000           bhash = 0x0000000000000000           bpageno = (1:119)
bdbid = 6                            breferences = 0                      bUse1 = 13010
bstat = 0xc0000b                     blog = 0x32159bb                     bnext = 0x0000000000000000

PAGE HEADER:

Page @0x0000000080C26000

m_pageId = (1:119)                   m_headerVersion = 1                  m_type = 1
m_typeFlagBits = 0x4                 m_level = 0                          m_flagBits = 0x8000
m_objId (AllocUnitId.idObj) = 232    m_indexId (AllocUnitId.idInd) = 256
Metadata: AllocUnitId = 72057594053132288
Metadata: PartitionId = 72057594044219392                                 Metadata: IndexId = 0
Metadata: ObjectId = 1477580302      m_prevPage = (0:0)                   m_nextPage = (0:0)
pminlen = 8                          m_slotCnt = 2                        m_freeCnt = 8070
m_freeData = 118                     m_reservedCnt = 0                    m_lsn = (217:17834:77)
m_xactReserved = 0                   m_xdesId = (0:0)                     m_ghostRecCnt = 0
m_tornBits = 0

Allocation Status

GAM (1:2) = ALLOCATED                SGAM (1:3) = ALLOCATED
PFS (1:1) = 0x61 MIXED_EXT ALLOCATED  50_PCT_FULL                         DIFF (1:6) = CHANGED
ML (1:7) = NOT MIN_LOGGED

DATA:

Slot 0, Offset 0x60, Length 11, DumpStyle BYTE

Record Type = PRIMARY_RECORD         Record Attributes =  NULL_BITMAP
Memory Dump @0x000000000B05C060

0000000000000000:   10000800 01000000 0100fe†††††††††††††...........

Slot 1, Offset 0x6b, Length 11, DumpStyle BYTE

Record Type = PRIMARY_RECORD         Record Attributes =  NULL_BITMAP
Memory Dump @0x000000000B05C06B

0000000000000000:   10000800 02000000 0100fe†††††††††††††...........

OFFSET TABLE:

Row - Offset
1 (0x1) - 107 (0x6b)
0 (0x0) - 96 (0x60)
I’ll elegantly jump over the buffer & header parts as they’re begging for posts on their own, and I can’t realistically show them the respect they need in this post. Instead we’ll concentrate on the DATA & OFFSET TABLE parts.
Let’s start out from the bottom up and look at the OFFSET TABLE:
Row - Offset
1 (0x1) - 107 (0x6b)
0 (0x0) - 96 (0x60)
Notice that it should be read from the bottom up as well, row 0 being the first, 1 being the second. The row offset table is basically an integer array pointing out the to locations in the 8KB page of the individual row locations. As we have two rows in our table, and they both fit on this page, there’s two entries in the offset table. The first row starts at byte index 96 - the first byte after the 96 byte header. The second row starts at index 107, 11 bytes after the first row. Let’s take a look at the first row (the rows are identical):
Slot 0, Offset 0x60, Length 11, DumpStyle BYTE

Record Type = PRIMARY_RECORD         Record Attributes =  NULL_BITMAP
Memory Dump @0x000000000B05C060

0000000000000000:   10000800 01000000 0100fe†††††††††††††...........
The first row has slot 0, it’s offset is 0x60 (96) and we already know the length is 11 bytes, from the offset table. Let’s take a look at the rows actual content, to understand what is stored.
- 10000800 01000000 0100FE The first byte is a status byte that contains info on how to parse the row contents. The value 0x10 defines the inclusion of a NULL_BITMAP, as indicated by the record attributes.
- 10000800 01000000 0100FE The next byte is currently (MSSQL2005) unused, but may be used in future versions.
- 10000800 01000000 0100FE The next two bytes store the byte index position of where to find the number of columns in this row, within the rows data. SQL Server stores numbers with the low order byte first, so the bytes must be switched around to get the position. Thus 0x0800 becomes 0x0008 (8 in decimal).
- 10000800 01000000 0100FE The next four bytes are the contents of the first column, a four byte integer. This is our identity column, and you’ll notice that the first row has a value of 0x00000001 while the second has a value of 0x00000002.
- 10000800 01000000 0100FE The next two bytes store the number of columns. Notice that this is stored at byte index 8, as indicated by the third and fourth bytes in the row.
- 10000800 01000000 0100FE Finally the null bitmap is stored in the last byte. 0xFE converted to binary is 1111 1110, indicating that the first column value is not null (the first 0, read backwards). The rest have a default value of 1, actually indicating that it is null. But since there’s only one column, these bits are never read. Note that one byte in the null bitmap can support up to 8 columns. The formula for determining the null bitmap size is (#cols+7)/8, using integer division.
Let’s do a rollback and create a new table with a slightly changed schema and values:
CREATE TABLE tmp
(
	ID int
)

CREATE CLUSTERED INDEX CI ON tmp (ID)

INSERT INTO tmp (ID) VALUES (1)
GO 2
We still have a single ID column, but this time it’s not an identity column, and we’re manually inserting the value “1” into the column. Thus both rows will have the same value. If we runn DBCC IND to get the page id, and then DBCC PAGE on the data page, we’ll get the following two rows:
Slot 0, Offset 0x60, Length 11, DumpStyle BYTE

Record Type = PRIMARY_RECORD         Record Attributes =  NULL_BITMAP
Memory Dump @0x000000000D90C060

0000000000000000:   10000800 01000000 0200fc†††††††††††††...........

Slot 1, Offset 0x6b, Length 19, DumpStyle BYTE

Record Type = PRIMARY_RECORD         Record Attributes =  NULL_BITMAP VARIABLE_COLUMNS

Memory Dump @0x000000000D90C06B

0000000000000000:   30000800 01000000 0200fc01 00130001 †0...............
0000000000000010:   000000†††††††††††††††††††††††††††††††...
The first row is almost identical to the last. It’s still 11 bytes long and its status bits indicate there’s only a null bitmap. One thing has changed however.
- 10000800 01000000 0200FC The number of columns indicater now has a value of 0x0002, indicating there is now two columns. How can that be? We only defined one column, and the row length is still 11 bytes.
If we take a look at the second row, we’ll see that the length is 19 bytes, an extra 8 bytes. Furthermore, the status byte has changed its value to 0x30, indicating there’s both a null bitmap, as well as a “variable columns” section. Take a look at the row data (note that I’ve concatenated the two lines to make it more readable):
- 30000800 01000000 0200FC01 00130001 000000 Obviously the value in this row is also 1, meaning both rows have the same value in the clustered index.
- 30000800 01000000 0200FC01 00130001 000000 The null bitmap has changed into the value 0xFC or 1111 1100, indicating that the first two (in other words, all) columns do not have null values.
- 30000800 01000000 0200FC01 00130001 000000 The last four bytes is a “uniqueifier” value that is added since the clustered key value is identical for multiple rows. Why wasn’t this added before? On the first table we didn’t define a clustered index, and therefore it was a heap table. In heap tables, pages are referenced by their phyiscal location and not their clustered key value. In a clustered table, rows are always referenced by their clustered key value. To uniquely reference a column, it’s important that each clustered key value is unique (which is why the clustered key is usually also the primary key, as is also the default in SSMS). If a clustered key is not unique, SQL Server adds its own uniqueifier value that makes the key unique - note that this only occurs when necessary, thus the lack of a uniqueifier on the first row, since that one is already unique. The uniqueifier is treated as a variable length column as we can potentially have more than 2^31-1 rows with the same value, at which point the uniqueifier will have to utilize eight bytes to ensure unique clustered key values.
- 30000800 01000000 0200FC01 00130001 000000 The previous four bytes are used to support the variable length column(s) in the row. The first two bytes indicate the number of variable length columns in the row (0x0001 - the single uniqueifier column), while the second pair of bytes indicate the end index of the first variable length column, that is 0x0013 (19 in decimal, which is also the total length of the row).
To elaborate on the variable length columns, consider the following table and values:
CREATE TABLE tmp
(
	t1 nvarchar(5),
	t2 nvarchar(5)
)

INSERT INTO tmp (t1, t2) VALUES ('a', 'b')
Let’s look at the row contents:
- 30000400 0200FC02 000f0011 00610062 00 The first bytes are used for the status & unused bytes, as well as the “number of columns” index.
- 30000400 0200FC02 000f0011 00610062 00 The next two bytes at index 0x0004 indicate there’s two columns.
- 30000400 0200FC02 000f0011 00610062 00 The null bitmap indicates that no columns have null values.
- 30000400 0200FC02 000f0011 00610062 00 The next two bytes indicate the number of variable length columns, 0x0002.
- 30000400 0200FC02 000f0011 00610062 00 The next two bytes indicate the ending position of the first variable length column, 0x000f (15).
- 30000400 0200FC02 000f0011 00610062 00 Likewise, the next two bytes indicate the ending position of the second variable length column, 0x0011 (17). If there were more variable length columns, each one of them would have a two-byte length indicator here, before the actual contents.
- 30000400 0200FC02 000f0011 00610062 00 After the variable length column end index indicators, the actual content is stored. We know that the first variable length column value ends at index 15, which gives us the value 0x0061 which happens to be a lowercase ‘a’.
- 30000400 0200FC02 000f0011 00610062 00 Likewise, we know that the second column ends at index 17, giving us the value 0x0062, being a lowercase ‘b’.
As a final example, let’s look at what happens when we have null values in our columns.
CREATE TABLE tmp
(
	t1 nvarchar(5),
	t2 nvarchar(5)
)

INSERT INTO tmp (t1, t2) VALUES ('a', 'b')
INSERT INTO tmp (t1, t2) VALUES (NULL, 'b')
INSERT INTO tmp (t1, t2) VALUES ('a', NULL)
INSERT INTO tmp (t1, t2) VALUES (NULL, NULL)
The resulting four rows should look like this:
Slot 0, Offset 0x60, Length 17, DumpStyle BYTE
Record Type = PRIMARY_RECORD         Record Attributes =  NULL_BITMAP VARIABLE_COLUMNS
Memory Dump @0x000000000DB0C060
0000000000000000:   30000400 0200fc02 000f0011 00610062 †0............a.b
0000000000000010:   00†††††††††††††††††††††††††††††††††††.

Slot 1, Offset 0x71, Length 15, DumpStyle BYTE
Record Type = PRIMARY_RECORD         Record Attributes =  NULL_BITMAP VARIABLE_COLUMNS
Memory Dump @0x000000000DB0C071
0000000000000000:   30000400 0200fd02 000d000f 006200††††0............b.

Slot 2, Offset 0x80, Length 13, DumpStyle BYTE
Record Type = PRIMARY_RECORD         Record Attributes =  NULL_BITMAP VARIABLE_COLUMNS
Memory Dump @0x000000000DB0C080
0000000000000000:   30000400 0200fe01 000d0061 00††††††††0..........a.

Slot 3, Offset 0x8d, Length 9, DumpStyle BYTE
Record Type = PRIMARY_RECORD         Record Attributes =  NULL_BITMAP
Memory Dump @0x000000000DB0C08D
0000000000000000:   10000400 0200ff00 00†††††††††††††††††.........
As a proof of SQL Server only adding fields when needed, there are no variable_columns attributes in the fourth row, since both columns are null and we therefore do not need to keep track of the length of the columns.
- 30000400 0200FC02 000F0011 00610062 00 The first row is identical to what we saw before.
- 30000400 0200FD02 000D000F 006200 In the second row the null bitmap is different: fd (1111 1101), indicating that the first column is null. We can also see that there’s two bytes missing from the row (0x0061) compared to the first row. 0d00 indicates that the first variable length column ends at index 0x000d (13), while the second variable length column ends at index 0f00 / 0x000f / 15. What’s interesting is that the variable column length indicators themselves end at index 13, and thus the first row ends where it starts - that is, it’s not there at all, it’s null. The second column is stored at index 14 + 15, the 6200 / 0x0062 / ‘b’ value.
- 30000400 0200FE01 000D0061 00 The third row takes up two bytes less, even though it has only a single null field like the second row. The null bitmap is slightly different (fe / 1111 1110) since it’s now the second column that’s null. What’s interesting is that in this row, only a single variable length column is present, not two. Thus there’s only a single variable length column end index identifier, 0d00 / 0x000d / 13. From that we can conclude that columns are handled in order, and thus one might want to consider the order of columns, if a specific column is usually null, it might be more efficient to have it ordered last.
- 10000400 0200FF00 00 The fourth row takes up just 9 bytes, this time sparing the data of both variable length columns since they’re both null according to the null bitmap (ff / 1111 1111).
Conclusion
- By using the undocumented DBCC commands IND and PAGE, we can get the actual page data from any page in the database.
- SQL Server uses a fixed and deterministic row layout, depending on the table metadata and column contents.
- By understanding the way SQL Server stores data, we’re able to optimize our storage even further than we would normally be able to.
- Data pages are just one of many page types in SQL Server. Later on, I might introduce other page types.