If you have ever deployed .NET windows applications, you have without doubt tried the Visual Studio Install project type. The Install project will create .MSI install applications for you, they’re great for basic installations, but nothing more than that. The .NET bootstrapper is quite lacking, at times it won’t be able to find the framework download file as it’s changed it’s location, at other times it’s not able to download it. And finally, if it does determine that the user needs the framework, it’s shown in an ugly uncustomizable GUI.
I’ve looked for an alternative, I’d prefer not to pay for using some of the well established installers such as Wise, InstallShield, ActiveInstall and so forth. What I found is a remnant of WinAmp, the NSIS (Nullsoft Scriptable Install System) project.
NSIS is both free and open source and it’s very much community driven. There are a plethora of plugins available for all sorts of different tasks, and of course you can write your own plugins for special needs.
I won’t delve too deeply into why you should choose NSIS over any of the competitors, instead I’ll show you a step by step guide of how to create an NSIS installer that bootstraps the .NET 2.0 framework as well as running custom install and uninstall actions in .NET code.
You will need two tools. The first (and actually the only required tool) is NSIS itself: Download NSIS from nsis.sourceforge.net. While you can edit the install script in any text editor, using an IDE like HM NIS Edit (HMNE) makes it a whole lot easier: Download HMNE from hmne.sourceforge.net.
Let’s first create the simple application that we will be installing. It doesn’t really matter what it is, in this example I’ve made a single Windows Forms Application:

Now let’s start up HMNE. Click File -> New Script From Wizard. Fill in the relevant application date on the first page.
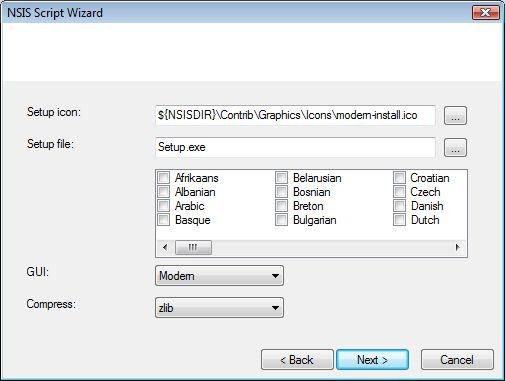
You may choose a custom icon for the installer, the default icon is an NSIS standard icon. You can also choose the resulting installation files name as well as it’s output location. If no location is specified, it will be outputted to the location that contains our script file. A great feature of NSIS is that it’s got localized versions for a lot of different languages built in, simply select the languages that the user should be able to select and the installer will automatically be localized. You can choose a couple of different GUIs, I personally prefer the Modern one. As for compression, in my tests the LZMA compression works the best, though compression time and CPU usage might be a factor for very large projects.
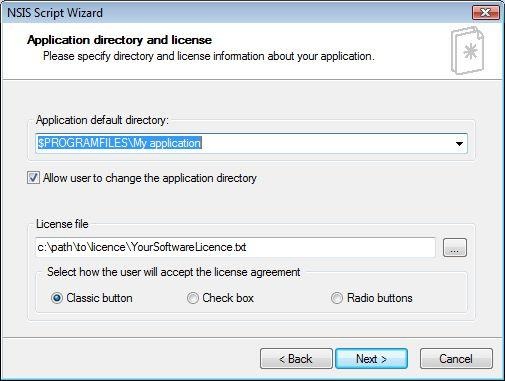
Now you specify where you want your application to be installed, notice the general use of variables like $PROGRAMFILES, $NSISDIR, $INSTDIR and so forth. You can also optionally choose a license file that the user must accept to continue the installation.
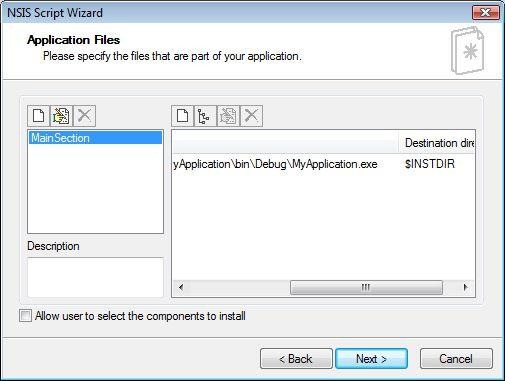
Now you can setup the actual files that will be installed as part of the project. You cannot select a whole project output as you can in the Visual Studio Install project, instead you must manually select the files that should be installed, usually from the Debug/Release directories of your project(s).
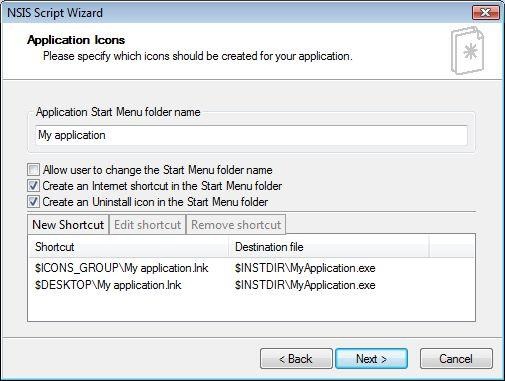
Optionally you can select which links you want to be placed in the application program group in the start menu, if such one should be created at all.

When the installation is done, the user can choose to view the Readme file and/or start the application - that is, if you specify an application and/or a readme file.
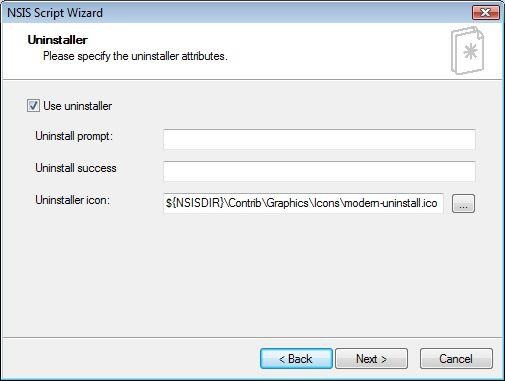
Finally we can choose to include an uninstaller, as well as specifying our custom uninstallation confirmation and report texts. If no custom text is specified, the default texts will be used.
When the wizard finishes, make sure to click “Save script” and “Convert file paths to relative paths”.
Finally the install script is made and ready to run. Press Ctrl+9 to compile the script. If everything succeeds, you’ll see the Setup.exe file in the same directory as the one where you saved the install script. I will not be going over the various commands and settings that are being set in the script, for that I strongly recommend the excellent built in help documents, as well as the WinAmp NSIS forums. Instead I’ll focus on how to bootstrap the .NET Framework 2.0 and how to run custom install and uninstall actions.
Add these three lines to the top of your nsi file, they include some functions that we will need:
; Script generated by the HM NIS Edit Script Wizard.
!include WordFunc.nsh
!insertmacro VersionCompare
!include LogicLib.nsh
Add this line right above the .onInit function, it makes a variable (untyped) that’ll contain a Yes/No value, depending on whether we need to install the .NET Framework or not.
Var InstallDotNET
Now modify the .onInit function so it matches the below, as well as adding the GetDotNETVersion function. First we ask the user what language they want to continue in (!insertmacro MUI_LANGDLL_DISPLAY). After that we initialize the InstallDotNET variable to “No”. Depending on the result of the GetDotNETVersion we tell the user that we need to install the framework, either because the user does not have the framework at all, or because the version is less than 2.0. We won’t actually install the framework yet, we’ll just remember whether we have to or not.
Function .onInit
  !insertmacro MUI_LANGDLL_DISPLAY

  ; Check .NET version
  StrCpy $InstallDotNET "No"
  Call GetDotNETVersion
  Pop $0

  ${If} $0 == "not found"
        StrCpy $InstallDotNET "Yes"
  	MessageBox MB_OK|MB_ICONINFORMATION "${PRODUCT_NAME} requires that the .NET Framework 2.0 is installed. The .NET Framework will be downloaded and installed automatically during installation of ${PRODUCT_NAME}."
   	Return
  ${EndIf}

  StrCpy $0 $0 "" 1 # skip "v"

  ${VersionCompare} $0 "2.0" $1
  ${If} $1 == 2
        StrCpy $InstallDotNET "Yes"
  	MessageBox MB_OK|MB_ICONINFORMATION "${PRODUCT_NAME} requires that the .NET Framework 2.0 is installed. The .NET Framework will be downloaded and installed automatically during installation of ${PRODUCT_NAME}."
   	Return
  ${EndIf}
FunctionEnd

Function GetDotNETVersion
	Push $0
	Push $1

	System::Call "mscoree::GetCORVersion(w .r0, i ${NSIS_MAX_STRLEN}, *i) i .r1"
	StrCmp $1 "error" 0 +2
	StrCpy $0 "not found"

	Pop $1
	Exch $0
FunctionEnd
Before we continue, you’ll have to install the InetC plugin.
Now find the “MainSection” section (depending on what you called it in the wizard).
Modify the section so it looks like the below. Your file names and amount may vary, the primary part of our concern is the first part. It will test whether the $InstallDotNET variable implies that we have to install the framework. If it does, it’ll hide the usual GUI elements of the installer and start the download of the .NET Framework from any URL you specify, this could be the official download URL or a location you host yourself. If the user cancels the download we’ll delete the half-finished file and abort. Otherwise we’ll execute the dotnetfx.exe file and wait for it to complete (hence we’ll now have the .NET Framework 2.0). After having installed the framework we delete the dotnetfx.exe file again. Finally we show the GUI again.
Section "MainSection" SEC01
  SetOutPath "$INSTDIR"
  SetOverwrite ifnewer

  ; Get .NET if required
  ${If} $InstallDotNET == "Yes"
     SetDetailsView hide
     inetc::get /caption "Downloading .NET Framework 2.0" /canceltext "Cancel" "http://www.url_of_the_dotnetfx.exe_file" "$INSTDIRdotnetfx.exe" /end
     Pop $1

     ${If} $1 != "OK"
           Delete "$INSTDIRdotnetfx.exe"
           Abort "Installation cancelled."
     ${EndIf}

     ExecWait "$INSTDIRdotnetfx.exe"
     Delete "$INSTDIRdotnetfx.exe"

     SetDetailsView show
  ${EndIf}

  File "InstallbinDebugInstall.exe"

  File "InstallbinDebugUninstall.exe"

  File "MyApplicationbinDebugMyApplication.exe"
  CreateDirectory "$SMPROGRAMSMy application"
  CreateShortCut "$SMPROGRAMSMy applicationMy application.lnk" "$INSTDIRMyApplication.exe"
  CreateShortCut "$DESKTOPMy application.lnk" "$INSTDIRMyApplication.exe"
SectionEnd
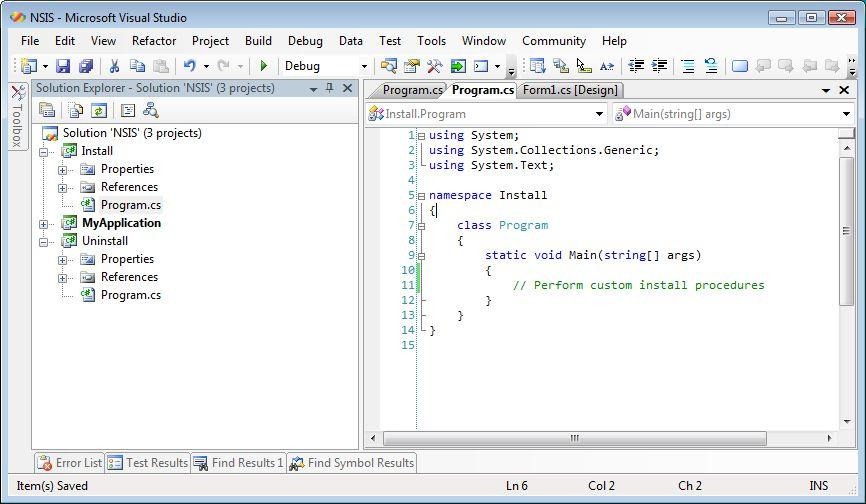
Now comes the part where I’ll introduce our custom .NET install and uninstall actions. Create two new Console Application projects in the solution called Uninstall and Install, like the following:
Add the below function to your code, it’ll run the Install.exe file after the installation has successfully completed:
Function .onInstSuccess
         ExecWait "$InstDirInstall.exe"
FunctionEnd
Locate the “Section Uninstall” part and add the following line as the very first:
ExecWait "$InstDirUninstall.exe"
Make sure to add both Install.exe and Uninstall.exe to the list of files that will be installed, in the Main Section. It will run the Uninstall.exe application before anything else, and wait for it to finish before continuing. After it’s done we’ll delete all the installed files, including the Install and Uninstall.exe applications - remember to add those to file deletions manually, following the syntax of the other file deletions.
Now press Ctrl+9 to build the installer, and look at it run in all of its awesomeness:

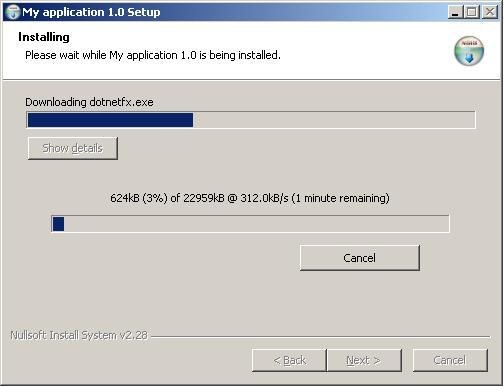
After having downloaded the .NET Framework 2.0, it’ll start the .NET installer and run it through as usual, the installation will continue as soon as the .NET installer finishes. There is currently no check for whether the user cancels the .NET installation midways or if it fails. A simple check could be made right afterwards by simple calling the GetDotNETVersion function again like we did just before, if it fails, the user hasn’t installed .NET for some unknown reason and we’ll have to abort.
You can see my complete install script here. Download and rename to *.nsi to compile it.