In this post I’ll do a deep dive into how vardecimals are stored on disk. For a general introduction to what they are and how/when to use them, see this post.
Is vardecimal storage enabled?
First up, we need to determine whether vardecimals are enabled, since it completely changes the way decimals are stored on disk. Vardecimal is not a type itself, so all columns, whether stored as decimals are vardecimals share the same system type (106). Note that in SQL Server, numeric is exactly the same as decimal. Anywhere I mention decimal, you can substitute that with numeric and get the same result.
Provided SQL Server is running, you can execute the following to determine the vardecimal status of any given table:
SELECT OBJECTPROPERTY(OBJECT_ID('MyTable'), 'TableHasVarDecimalStorageFormat')
If you don’t have access to, or do not want to use the OBJECTPROPERTY function, you can query the sys.system_internals_partition_columns DMV to obtain the same information – see Determining If vardecimal Is Enabled For a Table Without Using OBJECTPROPERTY.
Fixed length goes variable length
Normal decimal columns are stored in the fixed length portion of a record. This means all that’s actually stored is the data itself. There is no need for length information as the number of required storage bytes can be calculated exclusively by the use of metadata. Once you enable vardecimals, all decimals are no longer stored in the fixed length portion of the record, but as a variable length field instead.
Storing the decimal as a variable length field has a couple of implications:
- We can no longer statically calculate the number of bytes required to store a given value.
- There’s a two byte overhead for storing the record offset value in the variable length offset array.
- If the record previously had no variable length records, that overhead is actually four bytes since we also need to store the number of variable length records in the record offset array.
- The actual value of the decimal has a variable amount of bytes that we need to decipher.
What does the vardecimal value consist of?
Once we’ve parsed the record and thereby retrieved the vardecimal value bytes from the variable length portion of the record, we need to parse it. There will always be at least two bytes for the value, though there can be up to 20 at most.
Where normal decimals are basically stored as one humongous integer (with the scale metadata defining the decimal position), vardecimals are stored using scientific notation. Using scientific notation, we need to store three different values:
- The sign (positive/negative).
- The exponent.
- The mantissa.
Using these three components, we can calculate the actual number using the following formula:
(sign) * mantissa * 10<sup>exponent</sup>
Example
Assume we have a vardecimal(5,2) column and we store the value 123.45. In scientific notation, that would be expressed as 1.2345 * 102. In this case we have positive sign (1), an mantissa of 1.2345 and an exponent of 2. SQL Server knows that the mantissa always has a fixed decimal point after the first digit, and as such it simply stores the integer value 12345 as the mantissa. While the exponent is 2, SQL Server knows we have a scale of 2 defined, and it subtracts that from the exponent and thus stores 0 as the actual exponent.
Once we read it, we end up with a formula like this for calculating the mantissa (note that at this point we don’t care if the mantissa is positive or negative – we’ll take that into account later):
mantissa / 10<sup>floor(log10(mantissa))</sup>
And plotting in our values, we get:
12345 / 10<sup>floor(log10(12345))</sup>
Through basic simplification we get:
12345 / 10<sup>4</sup>
Which finally ends up in the scientific notation version of the mantissa:
1.2345
So far so good – we now have the mantissa value. At this point we need just two things – to apply the sign and to move the decimal into the right position by factoring in the exponent. As SQL Server knows the scale is 2, it stores an exponent value of 2 instead of 4, in effect subtracting the scale from the exponent value – enabling us to ignore the scale and just calculate the number directly.
And thus we have all we need to calculate the final number:
(sign) * mantissa * 10<sup>exponent</sup> => (1) * 1.2345 * 10<sup>2</sup> => 1.2345 * 10<sup>2</sup> = 123.45
Reading the sign & exponent
The very first byte of the value contains the sign and the exponent. In the previous sample, the value takes up four bytes (plus an additional two for the offset array entry):
0xC21EDC20
If we take a look at just the first byte, and convert it to binary, we get the following:
Hex: C2
Bin: 11000010
The most significant bit (the leftmost one), or bit 7 (0-indexed) is the sign bit. If it’s set, the value is positive. If it’s not set, it’s negative. Since it has a value of 1, we know that the result is positive.
Bits 0-6 is a 7-bit value containing the exponent. A normal unsigned 7-bit value can contain values from 0 to 127. As the decimal data type has a range of –1038+1 to 1038-1, we need to be able to store negative numbers. We could use one of those 7 bits as a sign bit, and then store the value in just 6 bits, allowing a range from –64 to 63. SQL Server however does use all 7 bits for the value itself, but stores the value offset by 64. Thus, an exponent value of 0 will store the value 64. An exponent of –1 will store 63 while an exponent of 1 will store 65, and so forth.
In our sample, reading bits 0-6 gives the following value:
0b11000010 = 66
Subtracting the offset of 64 leaves us with an exponent value of 2.
Mantissa chunk storage
The remaining bytes contain the mantissa value. Before we get started, let’s convert them into binary:
Hex: 1E       DC       20

Bin: 00011110 11011100 00100000
The mantissa is stored in chunks of 10 bits, each chunk representing three digits in the mantissa (and remember, the mantissa is just one large integer – it’s not until later that we begin to think of it as a decimal pointer number). Splitting the bytes into chunks gives us the following grouping:
Hex:   1E       DC       20
Bin:   00011110 11011100 00100000

Chunk: 1          2
In this case, SQL Server wastes 4 bits by using a chunk size that doesn’t align with the 8-bit byte size. This begs the question, why choose a chunk size of just exactly 10 bits? Those 10 bits are required to represent all possible values of a three-digit integer (0-999). What if we instead wanted to use a chunk size representing just a single digit?
In that case, we’d need to represent the values 0-9. That requires a total of 4 bits (0b1001 = 9). However, using those 4 bits, we can actually represent a range spanning from 0 to 15 – which means we’re wasting 6 of those values as they’ll never be needed. In percentages, we’re wasting 6/16 = 37.5%!
Let’s try and plot some different chunk sizes into a graph:

We see that chunk sizes of both 4 and 7 have massive waste compared to a chunk size of 10. At 20 bits, we’re getting closer, but still waste twice as much as at 10.
Now, waste isn’t everything. For compression, ideally we don’t want to use more digits than absolutely necessary. With a chunk size of 10, representing 3 digits, we’re wasting two digits for values in the range of 0-9. However, for numbers in the range 100-999, we’re spot on. If we were to use a chunk size of 20 bits, representing 6 digits per chunk, we’d be wasting bytes for values 0-99999, while we’d be spot on for values 1000000-999999. Basically it’s a tradeoff – the higher the granularity, with the least amount of waste, the better. The further to the right we go in the graph, the less the granularity. With this, it seems obvious that a chunk size of 10 bits is an excellent choice – it has the lowest amount of waste with a suitable amount of granularity at 3 digits.
There’s just one more detail before we move on. Imagine we need to store the mantissa value 4.12, effectively resulting in the integer value 412.
Dec: 412
Bin: 01100111 00
Hex: 67       0
In this case, we’d waste 8 bits in the second byte, since we only need a single chunk, but we need two bytes to represent those 10 bits. In this case, given that the last two bits aren’t set, SQL Server will simply truncate that last byte. Thus, if you’re reading a chunk and you run out of bits on disk, you can assume that the remaining bits aren’t set.
Parsing a vardecimal value
Finally – we’re ready to actually parse a stored vardecimal (implemented in C#)! We’ll use the previous example, storing the 123.45 value in a decimal(5,2) column. On disk, we read the following into a byte array called value:
Hex: C2       1E       DC       20
Bin: 11000010 00011110 11011100 00100000
Reading the sign bit
Reading the sign bit is relatively simple. We’ll only be working on the first byte:
Hex: C2       1E       DC       20
Bin: 11000010 00011110 11011100 00100000
By shifting the bits 7 spots to the right, all we’re left with is the most significant bit, the least significant position. This means we’ll get a value of 1 is the sign is positive, and 0 if it’s negative.
decimal sign = (value[0] >> 7) == 1 ? 1 : -1;
Reading the exponent
The next (technically these bits come before the sign bit) 7 bits contain the exponent value.
Hex: C2       1E       DC       20
Bin: 11000010 00011110 11011100 00100000
Converting the value 0b1000010 into decimal yields the decimal result 66. As we know the exponent is always offset by a value of 64, we need to subtract 64 from the stored value to get to the actual exponent value:
Exponent = 0b1000010 – 0n64 <=> Exponent = 66 – 64 = 2
Reading the mantissa
Next up is the mantissa value. As mentioned, we need to read it in chunks of 10 bits, while taking care of there potentially being some truncated bits.
First, we need to know how many bits there are available. Doing this is straightforward – we simply multiply the number of mantissa bytes (which is all of the bytes, except one) by 8:
int totalBits = (value.Length - 1) * 8;
Once we know how many bits are available (3 bytes of 8 bits = 24 in this case), we can calculate the number of chunks:
int mantissaChunks = (int)Math.Ceiling(totalBits / 10d);
Since each chunk takes up 10 bits, we just need to divide the total number of bits by 10. If there’s padding at the end, to match a byte boundary, it’ll all be 0’s and won’t change the end result. Thus for a 2-byte mantissa we’ll have 8 bits to spare, which will all be non-significant 0’s. For a 3-byte mantissa we’ll have 4 bits to spare – once again adding 0 to the total mantissa value.
At this point we’re ready to read the chunk values. Before doing so, we’ll allocate two variables:
decimal mantissa = 0;
int bitPointer = 8;
The mantissa variable contains the cumulative mantissa value, accumulating value each time we read a new 10-bit chunk. The bitPointer is a pointer to the index of the bit currently being. As we’re not going to read the first byte, we’ll start this one off at bit index 8 (0-based, thus bit index 8 = the first bit of the second byte).
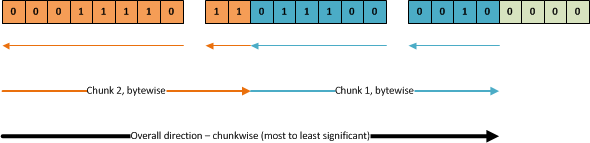
Looking at the bits as one long stream makes it look simple – we just read from left to right, right? Not quite. As you may remember, (visually) the rightmost bit is the least significant, and is thus the first one we should read. However – we need to read one byte at a time. As such, the overall direction is left-to-right, chunkwise. Once we get to any given chunk, we need to read one byte at a time. Bits 1-8 in the first chunk are read from the first byte, while bits 9-10 are read from the second byte, following the orange arrows in the figure (byte read order following the large ones, individual byte bit read order following the smaller ones):
To easily access all of the bits, and to avoid doing a lot of manual bit shifting, I initialize a BitArray that contains all of the data bits:
var mantissaBits = new BitArray(value);
Using this, you have to know how the bit array maps into the bytes. Visually, it looks like this, the mantissaBits array index being on top:
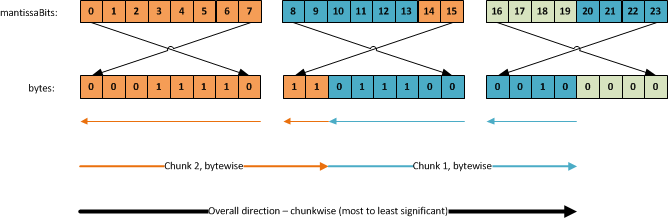
I know this may seem complex, but it’s all just a matter of knowing which pointers point to which values. Our source is the array of bytes. The way we access the individual bits is through the mantissaBits array, which is just one big array of pointers to the individual bits.
Looking at just the first 8 bits, the manitssaBits array aligns nicely with the direction we need to read. The first entry (mantissaBits[0]) points to the first/rightmost bit in the first byte. The second entry points to the second bit we need to read, and so forth. Thus, the first 8 bits are straightforward to read. The next two however, they require us to skip 6 entries in the mantissaBits array so we read index 14 and 15, as those point to the last two bits in the next byte.
Reading the second chunk, we have to go back and read bit index 8-13 and then skip to index 20-23, ignoring entries 16-19 as they’re just irrelevant padding. This is rather tricky to get right. Fortunately we can freely choose to read the bits from the least significant to the most significant, or the other way around.
Let’s first look at the implementation:
for (int chunk = mantissaChunks; chunk > 0; chunk--)
{
	// The cumulative value for this 10-bit chunk
	decimal chunkValue = 0;

	// For each bit in the chunk, shift it into position, provided it's set
	for (int chunkBit = 9; chunkBit >= 0; chunkBit--)
	{
		// Since we're looping bytes left-to-right, but read bits right-to-left, we need
		// to transform the bit pointer into a relative index within the current byte.
		int byteAwareBitPointer = bitPointer + 7 - bitPointer % 8 - (7 - (7 - bitPointer % 8));

		// If the bit is set and it's available (SQL Server will truncate 0's), shift it into position
		if (mantissaBits.Length > bitPointer && mantissaBits[byteAwareBitPointer])
			chunkValue += (1 << chunkBit);

		bitPointer++;
	}

	// Once all bits are in position, we need to raise the significance according to the chunk
	// position. First chunk is most significant, last is the least significant. Each chunk
	// defining three digits.
	mantissa += chunkValue * (decimal)Math.Pow(10, (chunk - 1) * 3);
}
The outer for loop loops through the chunks, going from the most significant to the least significant chunk. In this case we’ll first iterate over chunk 2, then chunk 1.
The chunkValue variable holds the total value for the chunk that we’re currently reading. We’ll be shifting bits into the variable until we have parsed all 10 bits.
Next, we loop from the most significant bit to the least significant bit (that is, going from the chunkBit values 9 through 0). By reading the most significant bit first, basically reading the values backwards, we avoid having to skip inside the individual bytes. We’ll always read the bits going from right to left in the mantissaBits array, following the top arrows like this:
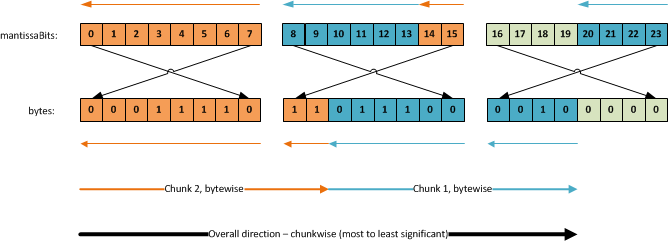
Though we do read each byte backward, everything else just follows a natural path, which makes parsing a lot easier.
The byteAwareBitPointer variable is the index in our mantissaBits array from where we’ll read the current value. The calculation ensures we read each byte starting from the top mantissaBits index to the lower one. The first chunk is read in the following mantissaBit index order:
7, 6, 5, 4, 3, 2, 1, 0, 15, 14
And the second chunk is read in the following mantissaBit order:
13, 12, 11, 10, 9, 8, 23, 22, 21, 20
Once we’ve read a specific bit, we shift it into position in the chunkValue variable – though only if it’s set and it’s available (that is, it hasn’t been zero-truncated).
Once all bits have been shifted into position, we apply the chunk significance to the value. In our case, storing the value 12345, we’re actually storing the value 123450 (since each chunk stores three digits, it’ll always be a multiple of 3 digits). The first read chunk (chunk 2) contains the value 123, which corresponds to the value 123000. The second read chunk (chunk 1) contains the value 450. Multiplying by 10(chunk–1)<3 ensures we get the right order of magnitude (x1000 for chunk 2 and x1 for chunk 1*). For each chunk iteration, we add the finalized chunk value to the total mantissa sum.
Once we have the integer based mantissa value of 123450, we need to insert the decimal point, using the following formula:
mantissa = mantissa / 10<sup>floor(log10(mantissa))</sup>
Implemented like so:
mantissa = mantissa / (decimal)Math.Pow(10, Math.Floor(Math.Log10((double)mantissa)));
This results in the mantissa having a value of 1.2345
Mantissa parsing performance
Before you beat me to it – this implementation is far from fast. To start with, we could easily shift whole groups of bits into position instead of just one at a time. That’d ensure each chunk would take no more than two shifting operations, instead of ~10 in this implementation. However, my goal for this implementation is code clarity first and foremost. I’m nowhere near the point where I want to look at optimizing OrcaMDF for speed.
Putting it all together
Once we have the sign, the exponent and the mantissa, we simply calculate the final value like so:
return sign * mantissa * (decimal)Math.Pow(10, exponent);
In our case it has the following result:
1 * 1.2345 * 10<sup>2</sup> = 1.2345 * 100 = 123.45
Conclusion
Vardecimal was the only option for built-in compression back in SQL Server 2005 SP2. Since 2008, we’ve had row & page compression available (which both feature a superset of the vardecimal storage format). Ever since the release of row & page compression, Microsoft has made it clear that vardecimal is a deprecated feature, and it will be removed in a future version. Since vardecimal requires enterprise edition, just like row & page compression, there’s really no reason to use it, unless you’re running SQL Server 2005, or unless you have a very specific dataset that would only benefit from compressing the decimals and no other values.
Knowing how the vardecimal storage format works is a great precursor for looking at compression internals – which I’ll be writing about in a later post – and I’ll be presenting on it at the 2012 Spring SQL Server Connections.
In the meantime you can check out my SqlDecimal.cs implementation on github. Or you can have a look at the complete OrcaMDF source code.