This works excellent as long as SQL Server is running, and you have access to the OBJECTPROPERTY function. However, as for all I know, there’s no DMV that exposes the vardecimal status for a table. I’ve also not been able to find this property in any of the base tables (if you know where/how it’s actually stored, please let me know!).
However, I’ve come up with the following query as a workaround for determining if vardecimal is enabled for a given table, without using OBJECTPROPERTY:
SELECTCOUNT(*)
FROM
sys.system_internals_partition_columns PC
INNERJOIN
sys.partitions P ON P.partition_id = pc.partition_id
INNERJOIN
sys.tables T ON T.object_id = P.object_id
WHERE
T.name = 'MyTable'AND
P.index_id <= 1AND
PC.system_type_id = 106AND
PC.leaf_offset < 0
What this does is to look for all of the decimal columns for the table, stored on any partition (as vardecimal is set at the table level, we don’t really care about the specific partitions) belonging to either the clustered index or heap.
Note that while this is usually true, you can actually have partitions within the same object, with both decimal and vardecimal columns. If you enable and disable vardecimal quickly, you’ll often see an extra partition with the old schema definition, though no pages are allocated. Thus, if you’re using this method for parsing purposes - make sure to check at the partition level. For most use cases, this won’t be an issue.
If any of those decimal columns have a negative leaf_offset value (result > 0), we can be sure that vardecimal is enabled for the table. The leaf_offset value determines the physical order of the fixed length columns in the actual records stored on disk. All variable length columns will have a negative value, and as such, normal decimal columns should always have a positive value. If any decimal column has a negative leaf_offset value, we know it’s stored in the variable length section of the records – and only vardecimals are stored that way!
Example
Here’s a table without vardecimal enabled:
CREATETABLE MyDecimalTable (A decimal(5, 0))
SELECTCOUNT(*)
FROM
sys.system_internals_partition_columns PC
INNERJOIN
sys.partitions P ON P.partition_id = pc.partition_id
INNERJOIN
sys.tables T ON T.object_id = P.object_id
WHERE
T.name = 'MyDecimalTable'AND
P.index_id <= 1AND
PC.system_type_id = 106AND
PC.leaf_offset < 0
And here’s one with vardecimal enabled:
CREATETABLE MyVardecimalTable (A decimal(5, 0))
EXEC sp_tableoption 'MyVardecimalTable', 'vardecimal storage format', '1'SELECTCOUNT(*)
FROM
sys.system_internals_partition_columns PC
INNERJOIN
sys.partitions P ON P.partition_id = pc.partition_id
INNERJOIN
sys.tables T ON T.object_id = P.object_id
WHERE
T.name = 'MyVardecimalTable'AND
P.index_id <= 1AND
PC.system_type_id = 106AND
PC.leaf_offset < 0
Las Vegas feels like home to me, ever since going there the first time at age 7 and looking at all those ever so banned-for-me slot machines. I’ve since gone there more times than I can count, including my 21st birthday – and what a difference that age does, in a city like Las Vegas. I’ve been to the CES conference, DevConnections (2007) and I’ve played a hand of poker or two, eventually ending up in me staying there for a month to participate in the World Series of Poker (finished #822 out of 8.773).
With Las Vegas being so special to me, I’m extremely thrilled and honored to announce that I’ll be presenting at the SQL Server Connections conference, March 26-29, 2012 at the MGM Grand in Las Vegas!
SQL433: Optimizing Storage and Performance Using Page and Row Compression
Since SQL Server 2005, we’ve been able to use the vardecimal data type to store decimals efficiently. With SQL Server 2008 came row and page compression, resulting in much better options for compressing our data. However, neither row nor page compression are panaceas! In this session I’ll walk you through the internals of row and page compression, and based on that knowledge, enable you to better evaluate when to use which type of compression, if compression should be used at all. Once we’ve decided to use compression, how do we determine its effectiveness? What are the pitfalls to look out for? I’ll give you a full tool belt of knowledge to bring home and put to use on your databases.
SQLConnections
One of the really awesome features of SQLConnections is that it’s co-hosted alongside ASP.NET & Silverlight, Visual Studio, SharePoint as well as Cloud & Windows Connections. Each with their own set of tracks and speakers. It’s a humongous event, and I love the fact that you can mix them together – you can freely mix sessions from all the different conferences.
Before being confirmed as a speaker at SQLConnections, I’d already submitted a ton of sessions for SQLBits X and SQLSat105. While I could just cram in SQLSat105 in Dublin on the 24th of March, I just can’t afford the extra stop on the trip. Unfortunately that means I’ve had to withdraw my submissions :(
As for SQLBits X, not going is simply not an option. SQLBits 9 was awesome, and I’ve really been looking forward to going again, whether I’m speaking or not. As such, I’ll be flying out of Vegas in the evening of March 29th, arriving in London on the 30th of March, just in time to catch day two and three of SQLBits X.
I’m really looking forward to presenting at SQLConnections, and I’m equally excited to meet a lot of good friends again at both Connections and SQLBits X!
PS – If anyone wants to share rooms at either Connections or SQLBits, let me know!
I’d heard many rumors about the excellent SQLBits session evaluation results that speakers are sent. Knowing the SSRS geeks on the SQLBits team, I’d expect nothing short of data & graph filled reports – and I’m glad to say they didn’t disappoint!
Besides my precon, I presented my Knowing the Internals, Who Needs SQL Server Anyway session. Before I start – thanks to all of you who attended my session(s), and especially thanks to those of you who filled out the feedback forms! Unfortunately the A/V people had some troubles with the microphone, so the video cuts off after about 10 minutes. Hopefully my SQLRally Nordic presentation will be made public – if/when it does, I’ll post it here.
The results
Looking at the overall results, I’m extremely pleased to see that I’m pretty much top rated for the demos, expectations and overall categories. While my knowledge trumps all the other ratings I received, someone clearly set the bar extremely high there – I suspect it might be Thomas Kejser as his session was simply out of this world. Note that the graph is kind of misleading as the scale goes from 1-9, not 10.
Score distribution
Looking at the score distribution, I got a single 4 and a single 5, while the rest is 7+ with a heavy bias on 8’s and 9’s – can’t be anything but extremely satisfied. That being said – I’d love to weed out that single 4 & 5, thankfully they’ve included comments with their feedback.
Comments
I’ve listed all of the comments I got, including the average score for that comment (on a scale of 1-9). There were 20 evaluations in total, and out of those, 14 were commented. I, as all speakers, really appreciate the comments, whether to critique or praise – thank you!
9 - Excellent content, great overview of what can be achieved.
9 – Was a lot to cover in one hour but Mark did a fantasic job, has really inspired me to learn a lot more.
9 – Very impressive!
9 – Thanks for sharing. This wasn’t the most useful but a great deep dive into SQL internals and did inspire which I think is the purpose of a 1 hour session.
9 – Far too much spare time on your hands! Enjoyed it though, makes you think about how you store data and use the correct data types.
9 – While overwhelming at times this was probably my favourite session of SQLBits, It was a very insightful look at the computing principles that make SQL Server work. Considering the very technical content Mark did an excellent job of explaining his thought processes. The slides were very clear and the demos when stopping SQL Server, modifying the file in a Hex editor and then restarting to see the updated stats really joined everything together.
9 – One of the presentations of the few days for me. Whilst the material was probably a little bit too detailed for any practical use I may currently have, it’s great to watch someone with great presentation skills (rare for a lot of techies?), sense of humour and a genuine enthusiasm for the work/hobby he is undertaking.
9 – Very impressive session. Technical level of the session was very high (as stated at the start). Watched Klaus Aschenbrenner’s internals session from previous SQL bits and felt this was a good pre-cursor. Will definitely be downloading OrcaMDF.
8.66 – My favourite talk of the conference. Absolutley superb.
8.5 – Mark handled a topic with many grey areas with consummate ease. Lots of undocumented detail, quite incredible perseverance with a topic that is largely a black box.
8.5 – Excellent session - wished id have done the Full day thursday!!!! Marks knowledge in the subjects was second to none!!
8 – Very interesting session. Not entirely useful yet, but I can believe that by continuing to reverse engineering the file format this would be very useful knowledge to have.
7.66 – Really interesting stuff. Possibly not immediately usable in the work place, but it’s good background information.
7.5 – Tough choice between this one and around the world session. Only negative was a bit heavy on the slides but this is a tough topic to demo in 1 hour so maximum respect for pulling this off. Also, it was made clear that the session was to inspire and not teach. He had to push through the session quickly to make the hour and Mark did it well.
Conclusions
This session is not meant to teach, but to inspire.
That’s how I started out my session, and with good reason. Originally I held a 45 minute session at Miracle Open World earlier this year, which laid the foundation for my precon and session at SQLBits. While developing my precon, I suddenly ended up with a lot of material, way too much to present in just a single hour. I had to compress it somehow, so I basically had two choices – ditch 90% of the material, or ditch just 20% of the material and speed through the rest. I opted for the latter.
I made the choice that I’d rather give people the same experience that I had at my first SQL Server conference, several years ago. I went to a basic internals session, and suddenly it dawned upon me, how SQL Server wasn’t magic – it’s merely a bunch of deterministic rules for juggling with bytes on disk. Since then, I’ve been on a quest of learning how to SQL Server catches its fish, rather than just eating the fish it provides.
While I can’t deem any of the comments or ratings as negative, the only critique I got was on the direct practical usability of the content, as well as the amount of material presented in one hour. For both of those, I fully recognize what’s being said. As a result, some of my SQLBits X submissions are sessions that go in-depth on specific topics, that I’d otherwise just skimmed in my last session:
Revealing the Magic is the same session as Knowing the Internals – Who Needs SQL Server Anyways? I’ve renamed it to better reflect what my purpose with the session is – to reveal the magic. To hopefully provide that revelation of what SQL Server really is, once we hit the disk.
I look forward to an excellent 2012 with, hopefully, a lot of presentations to come!
Since I released OrcaMDF Studio, I’ve gotten aware of some base table differences between SQL Server 2008 and 2005. These differences causes OrcaMDF to fail since it’s coded against 2008 R2 and expect that format.
While working on support for SQL Server 2005, it dawned on me that I need to expand my testing to cover multiple SQL Server versions, instead of just hitting a single one. Somehow I also need to support the fact that some tests are only applicable for certain versions (e.g. sparse column tests should only be run for SQL Server 2008+, etc.).
NUnit TestCaseSourceAttribute to the rescue!
NUnit supports inline parameterized tests through the TestCase attribute. Even better, we can also provide the parameter data for test cases dynamically, using the TestCaseSource attribute.
First up, I implemented a simple enumeration covering the versions that I’m currently working on supporting:
The SqlServerTestAttribute class tells TestCaseSourceAttribute to find the test case source data in the private static versions property. The versions property enumerates all the DatabaseVersion values and returns them one by one – ensuring to set the test category to the name of the DatabaseVersion value.
Next up, I converted my current tests to use the new SqlServerTest attribute, instead of the previous vanilla NUnit Test attribute:
This causes all of my tests to be run once per enumeration value in the DatabaseVersion enumeration, automatically getting each of the values as input values in the version parameter.
Supporting different development environments
Now, I don’t want to force everyone to install all versions of SQL Server – they might just want to support SQL Server 2005 & 2008R2 for example. In the OrcaMDF.Core.Tests project, I’ve defined a connection string for each supported test database like so:
If a database doesn’t have a connection (the name corresponding to the DatabaseVersion enumeration value), the test won’t be run for that version, simple as that. In this case I’m currently ignoring SQL Server 2008 as I only have 2005 and 2008R2 installed on my machine.
To perform the filtering on available databases, I’ve modified my test cases to let the base class actually run the test, using a lambda:
[SqlServerTest]
publicvoidHeapForwardedRecord(DatabaseVersion version)
{
RunDatabaseTest(version, db =>
{
var scanner = new DataScanner(db);
var rows = scanner.ScanTable("HeapForwardedRecord").ToList();
Assert.AreEqual(25, rows[0].Field<int>("A"));
Assert.AreEqual("".PadLeft(5000, 'A'), rows[0].Field<string>("B"));
Assert.AreEqual(28, rows[1].Field<int>("A"));
Assert.AreEqual("".PadLeft(4000, 'B'), rows[1].Field<string>("B"));
});
}
The RunDatabase method is exposed in the SqlServerSystemTestBase class:
protectedvoidRunDatabaseTest(DatabaseVersion version, Action<Database> test)
{
string versionConnectionName = version.ToString();
// Only run test for this version if a connection string has been providedif (ConfigurationManager.ConnectionStrings[versionConnectionName] == null)
Assert.Inconclusive();
// Setup database and store file paths, if we haven't done so already
ensureDatabaseIsSetup(version);
// Run actual testusing (var db = new Database(databaseFiles[version]))
test(db);
}
If a corresponding connection string hasn’t been declared in the configuration file, we abort the test and mark it as inconclusive – we simply weren’t able to run it given the current setup. Next up, ensureDatabaseIsSetup() runs the usual setup code (as detailed in the earlier blog post), though this time once per database versions, per fixture. Finally an OrcaMDF instance is created and passed onto the actual test as a parameter.
Supporting different SQL Server feature versions
As mentioned, I need a way of executing some tests only on certain versions of SQL Server. The standard SqlServerTestAttribute automatically enumerations all values of the DatabaseVersion enumeration, but there’s no reason we can’t create a SqlServer2005TestAttribute like this:
Once we have the attributes, it’s as easy as marking the individual tests with the versions they’re supposed to be run on:
[SqlServer2008PlusTest]
publicvoidScanAllNullSparse(DatabaseVersion version)
{
RunDatabaseTest(version, db =>
{
var scanner = new DataScanner(db);
var rows = scanner.ScanTable("ScanAllNullSparse").ToList();
Assert.AreEqual(null, rows[0].Field<int?>("A"));
Assert.AreEqual(null, rows[0].Field<int?>("B"));
});
}
ReSharper test runner support
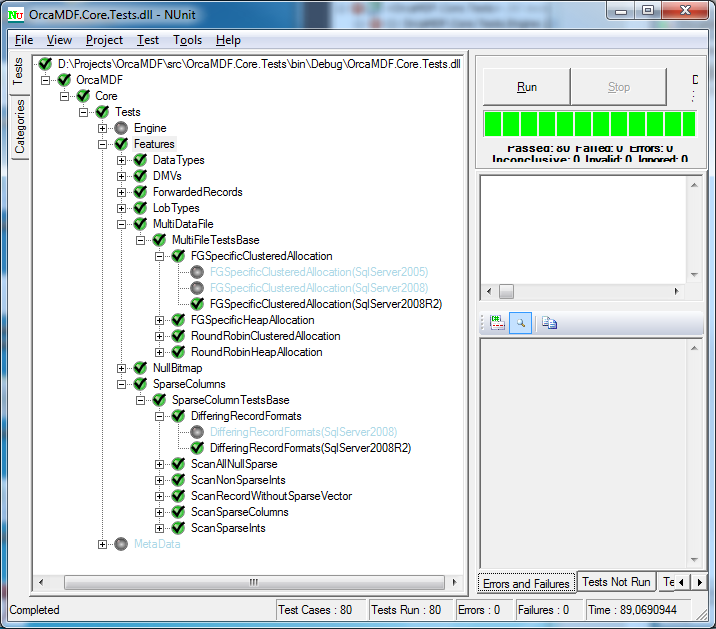
For the tests to run, you’ll need ReSharper 6.0 as ReSharper 5.1 doesn’t support the TestCaseSource attribute. Once you do, you’ll see a result like this once run (having enabled SQL Server 2005 & 2008 R2 testing in this case):
Each test case is automatically multiplied by each DatabaseVersion (the Parse test isn’t, since it doesn’t implement SqlServerSystemTestBase and thus isn’t run on multiple versions). Most of the tests are failing on SQL Server 2005 since I don’t support it yet. All 2008 tests are inconclusive as I’m not running the tests. And finally, all of the 2008R2 tests are green, yay!
Filtering the tests
Obviously, we don’t want to run the tests for all versions of SQL Server all the time, that’d simply be too time consuming. One way to disable the testing of a specific version would be to remove the connection string. However, that still yields an inconclusive output, and it’s somewhat cumbersome to edit the configuration file all the time.
Unfortunately, the ReSharper test runner doesn’t support category filtering of parameterized tests created using the TestCaseSourceAttribute. I’ve created a feature request case on YouTRACK as I really hope they’ll consider adding it for 6.1. If you also think it’d be awesome, please consider voting for the request case!
Fortunately, the NUnit test runner does support this kind of filtering. Opening the OrcaMDF.Core.Tests assembly in the NUnit test runner gives the following result:
Notice how it already knows about the parameterized test parameters, even before we’ve run the test! Also note how it recognizes that the DifferingRecordFormats test is only to be run on SQL Server 2008+ while the FGSpecificClusteredAllocation test is to be run on 2005+.
What’s even better – if we go to the Categories tab, we get a list of all the test categories:
By explicitly selecting certain categories, we can choose to run just those versions. Once run, the other versions will be clearly greyed out:
Note the horrible runtime of 89 secs – just over 1 second per test. 98% of that time is spent in the LobTypes feature testing. Thanks to the category format, I can also apply categories to the main tests themselves, and thus easily filter out the long running tests and just concentrate on the quick ones. Lob types are especially demanding to test since they involve a lot of disk activity, creating all of the setup tables & rows before hitting the database.
Going forward
Adding new versions is as simple as installing that version of SQL Server, adding a connection string in the configuration settings, and finally, adding the SQL Server name to the DatabaseVersion enumeration. That’s all there is to it.
On the more advanced side, at some point, I will need to test the many permutations of upgrade paths. Based on some testing I did, a SQL Server 2005 database upgraded to 2008R2 isn’t necessarily identical to a native 2008R2 one, or to a 2008-2008R2 upgraded one. As such, I’d need to test the many distinct upgrade paths to ensure full compatibility. However, that’s not high on my priority list, and it’d take even more time to test.
Just about two and a half months have passed since I last posted an OrcaMDF feature recap. Since then I’ve been busy attending three of the top SQL Server conferences – SQLBits, PASS and SQL Rally. It’s been excellent chatting about OrcaMDF and getting some feedback on where to take it, thanks to all of you!
Though I’ve been busy, I’ve also managed to put some work into OrcaMDF in the meantime.
New features
A non-exhaustive list of additions since my last post:
Optimized performance by more light weight usage of byte arrays, as well as sharing a single instance of the table schema between all rows.
I’ve also added support for the following extra data types:
money
smallmoney
uniqueidentifier
User defined types
And just one more minor thing…
OrcaMDF Studio
Common among much of the feedback I got was something along the lines of: Awesome project! I definitely want to try it out, but I haven’t had the time yet.
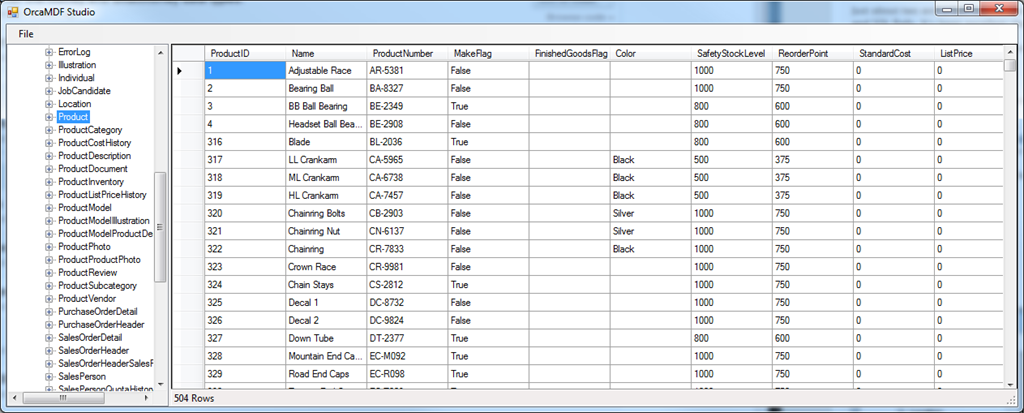
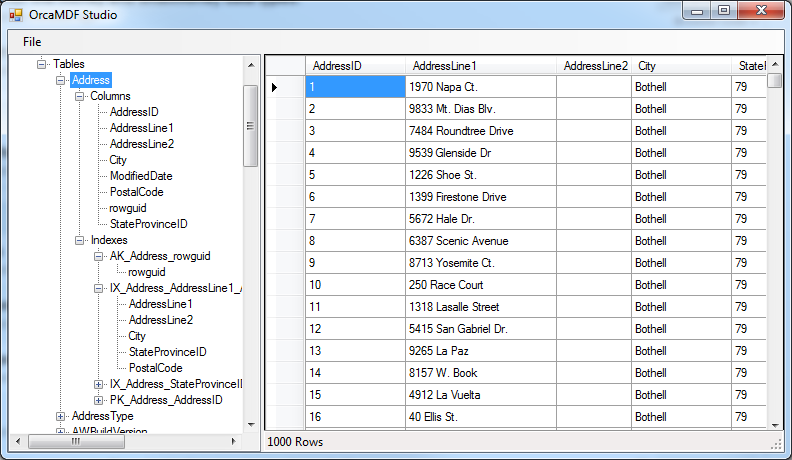
To be honest, it’s been somewhat cumbersome to try out OrcaMDF. You had to download the source, compile it yourself and then write your own application to actually invoke OrcaMDF. It’s never been my intention for it to be directly end user usable, as that’s just not my focus. However, to improve upon OrcaMDF, I need more usage feedback. As a result, I decided to create OrcaMDF Studio – an UI on top of OrcaMDF, allowing you to query user tables, dmvs and base tables without looking at any of the code at all. What you’re seeing here is OrcaMDF showing the contents of the Product table in a standard AdventureWorks 2008 database:
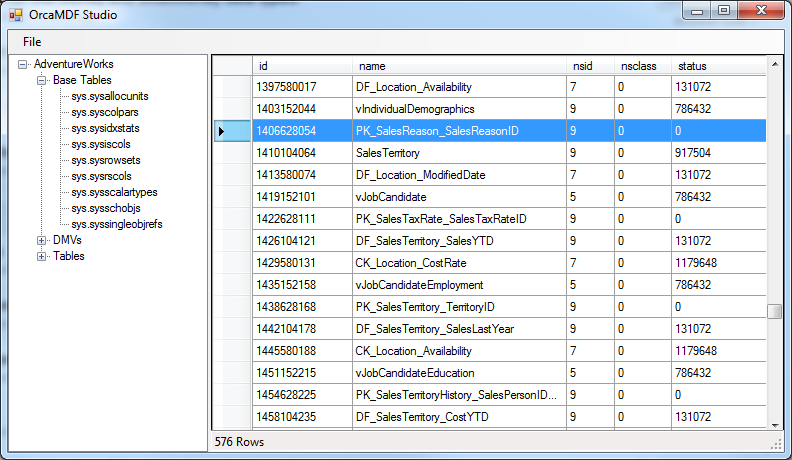
Base tables
OrcaMDF Studio exposes all of the base tables (that it currently supports & parses), just like normal tables:
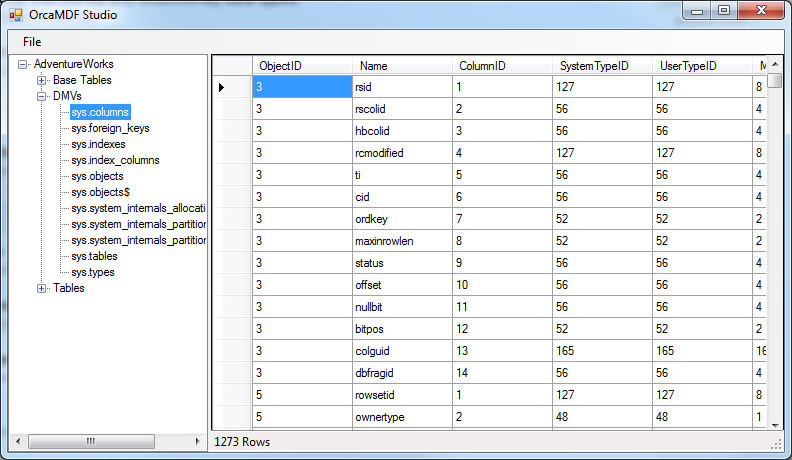
Dynamic Management Views
OrcaMDF also exposes all of the currently supported DMVs, just like any other table:
User tables, indexes & schemas
Finally, OrcaMDF also exposes all of the user tables, including their schemas, indexes and index schemas:
Error reporting
As OrcaMDF, and the Studio, is still far from production ready, you’ll probably run into unsupported scenarios or common bugs. If you do, OrcaMDF Studio will report it to you, as well as save a stack trace in the application directory. Here’s an example of a typical error – trying to open a table with an unsupported column type (xml for example):
If you look in the ErrorLog.txt file that’s written to the application directory, you’ll see an exception like this:
25-11-201100:41:21
----------
System.ArgumentException: Unsupported type: xml(-1)
at OrcaMDF.Core.MetaData.DataColumn..ctor(String name, String type, Boolean nullable) in D:ProjectsOrcaMDFsrcOrcaMDF.CoreMetaDataDataColumn.cs:line 135
at OrcaMDF.Core.MetaData.DataColumn..ctor(String name, String type) in D:ProjectsOrcaMDFsrcOrcaMDF.CoreMetaDataDataColumn.cs:line 20
at OrcaMDF.Core.MetaData.DatabaseMetaData.GetEmptyDataRow(String tableName) in D:ProjectsOrcaMDFsrcOrcaMDF.CoreMetaDataDatabaseMetaData.cs:line 155
at OrcaMDF.Core.Engine.DataScanner.ScanTable(String tableName) in D:ProjectsOrcaMDFsrcOrcaMDF.CoreEngineDataScanner.cs:line 31
at OrcaMDF.OMS.Main.loadTable(String table) in D:ProjectsOrcaMDFsrcOrcaMDF.OMSMain.cs:line 158
Completely anonymous data that just gives an indication of where the error occurred. If you run into issues like these, I would appreciate if you would send me the ErrorLog.txt file so I can debug potential issues. All issues, requests, error reports, etc. should be sent to my email.
Database version support
OrcaMDF has been developed for, and tested with, SQL Server 2008 R2. Some operations will work on SQL Server 2005, but many will fail since some of the base tables have different schemas. OrcaMDF does not differ and will thus throw up once you hit those differences. I’ll add an abstraction layer + support for both at a later time.
Opening live databases
OrcaMDF Studio will have to take a read lock on the database file(s) for now. As SQL Server takes exclusive locks on the files, this means you can’t open a live database. You can either detach the database, take it offline, backup-restore-detach or simply use a non-attached database to begin with. For a later release, I’ll add automatic VSS snapshot functionality.
System requirements
OrcaMDF is built on top of the .NET Framework 4.0 – as such, you will need to have it installed for OrcaMDF Studio to run. OrcaMDF Studio will run on both x64 and x86 machines.
Disclaimer
Once again, OrcaMDF + Studio is experimental software. I give no guarantees whatsoever, and you’re using it at your own risk. OrcaMDF will not write anything to disk and will thus not, in any way, modify your database files. However, I strongly suggest that you do not use this on a production database, either way.
OrcaMDF neither knows nor cares about security. No matter who owns that schema or object, OrcaMDF will parse it just fine – no need for pesky usernames and passwords. However, OrcaMDF does not support Transparent Data Encryption, so databases using TDE will not be supported.
Download
You can download the OrcaMDF Studio binary release at the OrcaMDF Github project page. Please don’t ever download OrcaMDF anywhere else, you risk that someone modifies the source and distributes their own version. Always get it from the Github project page.
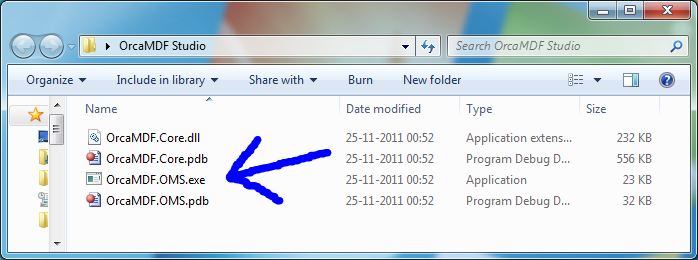
Once you download it, simply unpack it and run the OrcaMDF.OMS.exe application:
Note that this is a debug build – hence the .pdf files. Debug builds will be slightly slower than release builds, but it does enable me to get full stack traces if/when an exception occurs. Once OrcaMDF stabilizes, I’ll provide both debug and release versions.
Once you’ve made a mess and you’ve now got millions of objects you need to delete, how do you do that as fast as possible?
Characteristics of a delete request
Contrary to a PutObjectRequest, the DeleteObjectRequest carries a rather constant payload. If we look at the actual request, the only things varying is the object name (MyObject.txt in this case) and the x-amz-date header field, as set by the .NET AWS SDK:
DELETE http://improve-eu.dk.s3-eu-west-1.amazonaws.com/MyObject.txt HTTP/1.1User-Agent: aws-sdk-dotnet/1.3.16.0 .NET Runtime/4.0 .NET Framework/4.0 OS/6.1.7601.65536Authorization: AWS XYZx-amz-date: Tue, 15 Nov 2011 21:09:38 GMTHost: improve-eu.dk.s3-eu-west-1.amazonaws.comContent-Length: 0Connection: Close
The result is equally static:
HTTP/1.1 204 No Contentx-amz-id-2: k5r8aSZ3lpcWe4V255z7v8yqbMSPQQ7COEAGwsnRwzLeXpaJkSgRXNMoOf9ATdH0x-amz-request-id: DABA77DD2B542C43Date: Tue, 15 Nov 2011 21:09:37 GMTServer: AmazonS3
Looking at this particular request, it takes up 322 bytes, with the only really variable part, the object name, taking up 13 of those bytes. As such, a delete request takes up roughly 309 bytes + the object name. This means pipe width probably won’t be an issue – even with massive parallelization we won’t be able to saturate even a smaller line. Again, we’re forced to look into reducing latency and increasing parallelization to improve our mass delete performance.
Does object size & existence matter?
When uploading, the size of the object obviously matters, as shown in post on upload performance. For deletes, I’d assume object size wouldn’t matter. Just to be sure though, I made a test. Through four iterations, I created 1024 objects of 1KB, 1MB and 16MB size. I then, single-threaded, deleted each of those objects, one by one and recorded the total runtime. Once all the objects were deleted, I performed all of the delete requests again, even though the objects didn’t exist. I wanted to know whether the existence of an object had an impact on the request latency.
The tests were performed using an m1.large (100Mbps bandwidth reported by instance, usually more available) instance in the EU region, accessing a bucket also in the EU region. Once run, I discarded the best and worst results and took the average of the remaining two.
The first graphs shows some variance, which is to be expected. Key, however, is that neither the object size nor the existence of an object seems to have any general say in the performance. If we put this in a logarithmic scale, it’s a bit more apparent:
My guess is that Amazons S3 service is most likely handling a request by just marking the object, if it exists, as deleted, returning, and the asynchronously deleting the object from disk at a later time. As is usual database practice, the marking of an object as deleted and the existence check is probably done in the same query to the database, returning the number of rows affected. As such, performance is identical, no matter if an object exists or not, just as the size doesn’t matter as it’s physically deleted asynchronously.
I’ll use this fact in my testing as that means I can simply performance test deleting non-existing objects, sparing myself the need to upload deterministically named objects beforehand.
Multi-threaded deletes
The key to performance, as previously shown, is without doubt achieved by scaling out the number of threads.
The following test code spins up a given number of threads and lets them run for 30 seconds, before they’re all aborted. Each thread is continually looping, firing off as many DeleteObjectRequest’s as it can. After 30 seconds, the average request/sec is calculated and output. I ran four repetitions of each, discarded the top and bottom result and calculated the average of the remaining two.
privateconststring bucketName = "improve-eu.dk";
privateconststring serviceUrl = "s3-eu-west-1.amazonaws.com";
staticvoid Main(string[] args)
{
var config = new AmazonS3Config().WithServiceURL(serviceUrl).WithCommunicationProtocol(Protocol.HTTP);
int numThreads = Convert.ToInt32(args[0]);
int count = 0;
var sw = new Stopwatch();
// Ensuring all connections have network connectivity
ServicePointManager.DefaultConnectionLimit = numThreads;
// The actual job each thread will be performingvar work = new ThreadStart(() =>
{
using (var s3Client = AWSClientFactory.CreateAmazonS3Client(ConfigurationManager.AppSettings["AccessKeyID"], ConfigurationManager.AppSettings["SecretAccessKey"], config))
{
var request = new DeleteObjectRequest()
.WithBucketName(bucketName)
.WithKey("xyz");
while (sw.ElapsedMilliseconds <= 30000)
{
s3Client.DeleteObject(request);
// Avoid extra counts while threads are spinning downif(sw.ElapsedMilliseconds <= 30000)
count++;
}
}
});
// Warmupusing (var s3Client = AWSClientFactory.CreateAmazonS3Client(ConfigurationManager.AppSettings["AccessKeyID"], ConfigurationManager.AppSettings["SecretAccessKey"], config))
{
var request = new DeleteObjectRequest()
.WithBucketName(bucketName)
.WithKey("xyz");
s3Client.DeleteObject(request);
}
// Start X number of threads and let them upload as much as they canvar threads = new List<Thread>();
for (int j = 0; j < numThreads; j++)
threads.Add(new Thread(work));
sw.Start();
threads.ForEach(x => x.Start());
// Wait 30 secs, stop all threads, output reqs/sec result
Thread.Sleep(30000);
threads.ForEach(x => x.Abort());
Console.WriteLine((double)count / 30);
}
The following graph shows the results, testing with thread counts of 8, 16, 32, 64, 128, 256, being run on an m1.large instance, the more CPU-beefy c1.xlarge instance and finally the Danish Server 2003 Colo instance that I used in my last post:
Results clearly show similar performance characteristics – both EC2 servers max out at 32 threads. The m1.large instance managed 1428 requests/sec while the c1.xlarge instance managed 1591 requests/sec. I could probably go higher using a compute cluster instance, but that’s not what I’m trying to show in this post. The colo instance went further and didn’t max out until I was running 64 threads – most likely due to the larger latency, and thus added benefit of more outstanding requests.
Disabling the Nagle algorithm
I considered, and tested, whether disabling the Nagle algorithm might have an impact. However – since each of these requests are fired on a single connection that’s closed, and hence flushed, immediately afterwards – disabling the Nagle algorithm has no measureable effect.
Can we lower the CPU usage?
While the EC2 CPU isn’t maxed at 32 threads, it’s way higher than I’d like it to be, even just at 64 threads:
However, the code we’re running is already in a rather tight loop without much to optimize:
while (sw.ElapsedMilliseconds <= 30000)
{
s3Client.DeleteObject(request);
// Avoid extra counts while threads are spinning downif(sw.ElapsedMilliseconds <= 30000)
count++;
}
It’s basically just a loop, reusing the same request and letting the AmazonS3Client do its part to send off the object. Internally, AmazonS3Client.DeleteObject() is firing off the asynchronous BeginPutObject and then immediately waiting for EndPutObject afterwards. If we dig further in, there’s a lot of generic AWS SDK framework overhead in constructing the requests, checking for all sorts of conditions that may arise, but are not particularly relevant to our case. How about we ditch the SDK and create our own requests?
Following this guide on signing and authenticating REST requests, I constructed a method like this (minus the measuring and reformatting, this just shows the basic form):
var accessKeyID = "XYZ";
var secretAccessKey = "SecretXYZ";

using (var sha1 = new HMACSHA1())
{
	while(true)
	{
		var webrequest = (HttpWebRequest)WebRequest.Create("http://improve-eu.dk.s3-eu-west-1.amazonaws.com/xyz");
		webrequest.Method = "DELETE";
		webrequest.ContentLength = 0;
		webrequest.KeepAlive = false;
		webrequest.AllowWriteStreamBuffering = false;
		webrequest.AllowAutoRedirect = false;

		var date = DateTime.UtcNow.ToString("R");

		string stringToSign =
			"DELETE" + "n" +
			"n" +
			"n" +
			"n" +
			"x-amz-date:" + date + "n" +
			"/improve-eu.dk/xyz";

		string signature = AWSSDKUtils.HMACSign(stringToSign, secretAccessKey, sha1);

		webrequest.Headers.Add("x-amz-date", date);
		webrequest.Headers.Add("Authorization", "AWS " + accessKeyID + ":" + signature);

		webrequest.GetResponse().Close();
	}
}
This tries to push through as many requests as possible in as little time as possible, with as little framework overhead as possible. Alas, I saw no noteworthy improvements in performance so I’m glad to report that the AWS SDK seems well optimized, even with it’s generic looks. A side result was that I shaved off the user-agent and thereby ended up with slightly smaller requests:
DELETE http://improve-eu.dk.s3-eu-west-1.amazonaws.com/xyz HTTP/1.1x-amz-date: Wed, 16 Nov 2011 18:58:11 GMTAuthorization: AWS XYZHost: improve-eu.dk.s3-eu-west-1.amazonaws.comContent-Length: 0Connection: Close
This took me from a request size of 322 bytes down to 223 bytes on average. Sadly, this too had no noteworthy impact on performance.
Conclusion
Deletes carry a constant cost, both in payload size as well as execution time. We can’t batch them up and there’s no data to compress. As such, we’re left with just multi-threading and possibly optimizing the TCP/IP stack depending on the latency characteristics of the environment. The lower the latency, the fewer threads you should use. In my testing, a typical low-latency (e.g. EC2) environment seems to max out at 32 threads, where as a medium/high latency environment seems to max out at 64 concurrent threads.
Obviously there are steps between 32 and 64 threads and you may get better results at running just 50 threads – these are just ballpark test numbers. As always, your mileage may vary.
I’m sitting here on the train in Denmark, on the final leg home from SQLRally Nordic. During my presentation based on my OrcaMDF work, I implicitly announced that OrcaMDF now exposes metadata – thougt I might as well share here as well. Other than expanding the core engine support in OrcaMDF, one of the main features I’ve wanted to implement was a way for OrcaMDF to expose metadata about your database. How do you list the tables, indexes, columns, etc. from your database?
Avoiding false abstractions
My initial thought was to create my own abstraction layer on top of the objects. You could get the list of user tables by accessing the database.GetMetadata().UserTables enumeration, you’d get a list of tables, including columns, etc. This has a very clean interface from the development side, everything being normal .NET objects. However, it would also require me to come up with said abstraction – and where do I draw the line on what to expose and what to keep internal? What if my abstraction didn’t feel natural to DBAs, being used to the sys.* DMVs from SQL Server?
Exposing the built-in DMVs from SQL Server
I spent some time considering who might end up using OrcaMDF – and concluded there might be just about four persons in the world, and those four would be split evenly between DBA and SQL Server dev. Common for those is that they’re already used to navigating the metadata of SQL Server databses through system DMVs like sys.tables, sys.columns, sys.indexes etc. What then struck me was that I’m already able to parse all of the base tables in SQL Server, and using OBJECT_DEFINITION, I can get the source code of the built-in system DMVs. As such, it was a simple matter of creating my own replicas of the built-in DMVs.
How to use the DMVs in OrcaMDF
Say we wanted to retrieve all the columns for a given data in SQL Server, we create a query like this:
SELECT
c.*
FROM
sys.columns c
INNERJOIN
sys.tables t ON c.object_id = t.object_id
WHERE
t.name = 'Persons'
Doing the same in OrcaMDF could look like this:
using (var db = new Database(new[] { @"C:Test.mdf" }))
{
	var sys = db.Dmvs;

	var table = sys.Tables.Where(t => t.Name == "Persons").Single();
	var columns = sys.Columns.Where(c => c.ObjectID == table.ObjectID);

	foreach (var col in columns)
		Console.WriteLine(col.Name);
}
And if you prefer the more SQL-esque syntax of LINQ, you can of course do it like this as well:
using (var db = new Database(new[] { @"C:Test.mdf" }))
{
var sys = db.Dmvs;
var columns = from c in sys.Columns
join t in sys.Tables on c.ObjectID equals t.ObjectID
where t.Name == "Persons"select c;
foreach (var col in columns)
Console.WriteLine(col.Name);
}
No matter how you choose to do it, this is the result:
What’s available at this point
If you grab the latest commit of OrcaMDF, you’ll have access to the following DMVs, just as they’re exposed through SQL Server:
sys.columns
sys.indexes
sys.index_columns
sys.objects
sys.objects$
sys.system_internals_allocation_units
sys.system_internals_partitions
sys.system_internals_partition_columns
sys.tables
sys.types
More is definitely on their way. Let me know if you have a special wish for a DMV – I might just be able to make your wish come true!
Recently I’ve been working on a project where I’ve got millions of relatively small objects, sized between 5kb and 500kb, and they all have to be uploaded to S3. Naturally, doing a synchronous upload of each object, one by one, just doesn’t cut it. We need to upload the objects in parallel to achieve acceptable performance. But what are the optimal parameters when it comes to the number of simultaneous upload threads? Does it depend on the object size? How much of a difference does HTTPS over HTTP make? Let me share what I discovered during my testing.
Note that some of these graphs are much larger than what I can show in-page. All can be opened in full size by clicking them.
Test code
To reduce variance in the outcome, I’ve run all test cases four times and reported the average runtime. Each test case tries to upload 512 objects of a given size. In total, 2048 objects are uploaded across the four repetitions, before the average runtime is reported back. Even though I ran four repetitions, I still saw some fluctuations in the results that I’ll have to attest to variance.
I started out by using the thread pool and the asynchronous Begin/EndPutObject methods. However, even when setting the thread pool max/min thread/IO settings explicitly, I found the thread pool usage caused too much variance. Instead I went with manual thread control.
One major player is the ServicePointManager.DefaultConnectionLimit – this limits the number of active connections to any given host at the same time. By default, this has a low value of 2 and thus limits you to just two concurrent uploads to S3, before others are queued at the network level. If this limit is set below the number of active threads, you will invariably have threads waiting to open network connections. To avoid this, I set the connection limit equal to the number of threads I was running.
I tried running the tests both with and without MD5 checksum generation & verification, but I saw no measurable difference in the outcome.
At no point, in any of the test environments, were the CPUs stressed to the point where they were close to becoming bottlenecks. As the test object is all in-memory and no disk is involved, I’ve ruled out disks as a bottleneck factor as well. Thus, the number one of piece of hardware affecting the results is the network interface card (NIC).
Before starting the four repetitions of the test, I fire off a single PutObject request to warm up the stack. The test code is relatively simple, it runs in an infinite loop, checking whether we need to upload more objects, or whether we’re done. If done, it breaks the loop and ends the thread. When launching I start up X amount of threads and immediately after join with them to wait for them all to complete. The runtime includes the amount of time required to instantiate the threads, though it should have no measurable impact on the result. The runtime calculation is done using integer math for output simplicity, but the impact should be minimal in the big picture.
using System;
using System.Collections.Generic;
using System.Configuration;
using System.Diagnostics;
using System.Net;
using System.Threading;
using Amazon;
using Amazon.S3;
using Amazon.S3.Model;
namespace S3Optimization
{
class Program
{
privateconststring bucketName = "improve.dk";
privateconststring serviceUrl = "s3-eu-west-1.amazonaws.com";
// ConnectionLimit ObjSizeInKBstaticvoid Main(string[] args)
{
int repetitions = 4;
int uploadCount = 512;
int objSize = Convert.ToInt32(args[1]) * 1024;
int numThreads = Convert.ToInt32(args[0]);
string dir = "Optimization/" + Guid.NewGuid();
var config = new AmazonS3Config().WithServiceURL(serviceUrl).WithCommunicationProtocol(Protocol.HTTPS);
var sw = new Stopwatch();
object locker = newobject();
string obj = randomString(objSize);
// Ensuring all connections have network connectivity
ServicePointManager.DefaultConnectionLimit = numThreads;
// The actual job each thread will be performingvar work = new ThreadStart(() =>
{
using (var s3Client = AWSClientFactory.CreateAmazonS3Client(ConfigurationManager.AppSettings["AccessKeyID"], ConfigurationManager.AppSettings["SecretAccessKey"], config))
{
while (true)
{
lock (locker)
{
if (uploadCount <= 0)
break;
uploadCount--;
}
var request = new PutObjectRequest()
.WithBucketName(bucketName)
.WithKey(dir + "/" + Guid.NewGuid())
.WithContentBody(obj);
s3Client.PutObject(request);
}
}
});
// Warmupusing (var s3Client = AWSClientFactory.CreateAmazonS3Client(ConfigurationManager.AppSettings["AccessKeyID"], ConfigurationManager.AppSettings["SecretAccessKey"], config))
{
var request = new PutObjectRequest()
.WithBucketName(bucketName)
.WithKey(dir + "/" + Guid.NewGuid())
.WithContentBody(obj);
s3Client.PutObject(request);
}
// Actual timing
sw.Start();
for(int i=0; i<repetitions; i++)
{
int originalUploadCount = uploadCount;
var threads = new List();
for(int j=0; j<numthreads; j++)="" threads.add(new="" thread(work));="" threads.foreach(x=""> x.Start());
threads.ForEach(x => x.Join());
uploadCount = originalUploadCount;
}
sw.Stop();
Console.WriteLine(sw.ElapsedMilliseconds / repetitions);
}
staticstring randomString(int size)
{
var rnd = new Random();
var chars = "ABCDEFGHIJKLMNOPQRSTUVWXYZ";
char[] buffer = newchar[size];
for (int i = 0; i < size; i++)
buffer[i] = chars[rnd.Next(chars.Length)];
returnnewstring(buffer);
}
}
}
For running the tests, I’m using the following test runner application, testing all combinations of thread count and object size between 1 and 256/2048 respectively (in powers of 2):
The first test is done using a colocation (colo) Dell PowerEdge 1950 placed at a Danish ISP in Aarhus, Denmark. The server is running Windows Server 2003 x64 and has a single gigabit NIC with gigabit support throughout the network stack. Note that I won’t be mentioning neither CPU, memory nor disk for any of the machines. Neither of those were ever close to being the bottleneck and are thus irrelevant. Suffice to say – they all had plenty of CPU, memory and disk capabilities. A tracert from the server to the S3 EU endpoint in Dublin looks like this:
Tracing route to s3-eu-west-1.amazonaws.com [178.236.6.31]
over a maximum of 30 hops:
11 ms 4 ms 13 ms 89.221.162.24921 ms 1 ms 3 ms 10.1.2.133 ms 2 ms 2 ms 89.221.161.1054 <1 ms <1 ms <1 ms 92-62-199-177.customer.fuzion.dk [92.62.199.177]
5 <1 ms <1 ms <1 ms 87.116.1.15765 ms 4 ms 4 ms 93.176.94.17574 ms 4 ms 4 ms xe-3-3-0.cph10.ip4.tinet.net [77.67.74.37]
847 ms 47 ms 47 ms xe-2-2-0.dub40.ip4.tinet.net [89.149.181.37]
9 * * * Request timed out.
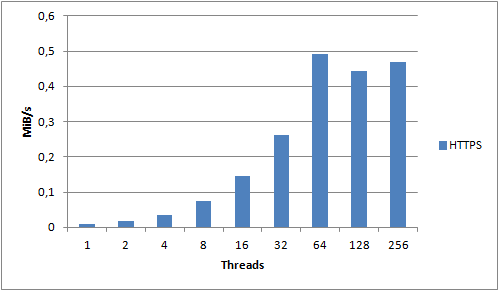
The following graph has the number of threads (that is, simultaneous uploads) on the X-axis and the MiB/s on the Y-axis. The MiB/s was calculated using the formula (UploadCount x ObjectSizeInKB / 1024 / AvgTimePerRepetitionInSeconds). Each color bar represents a given object size in KB as noted on the legend on the right. Note also that these results were made using the standard HTTPS protocol. You might ask yourself why I’m measuring MiB/s and not requests/s. Thing is – they’re exactly the same. MiB/s and requests/s are just calculations based on the time it took to run a fixed number of requests. The absolute values are less interesting than they are in relation to each other. If you want to take a look at the requests/sec, you can download my raw data at the end of the post.
There is an overwhelming amount of information in this graph alone. We can see how the general throughput seems to increase relatively linearly along the amount of threads, though they seem to reach their max potential at 128 threads.
Small object characteristics
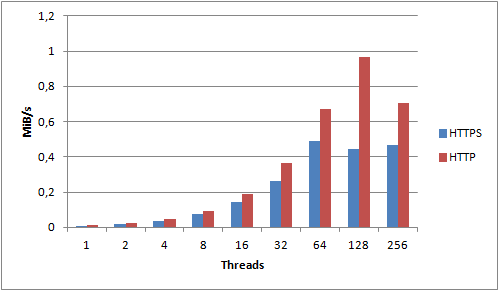
Let me zoom in on the 1KB object size:
For the 1KB object size we see clear improvements all the way up to 64 threads, after which it seems to stabilize. The 1KB object size is the one that incurs the most overhead due to S3 not utilizing persistent connections. Each request we make needs to create a new TCP connection and perform an SSL handshake. Compared to a 2MB object, we spend a lot more time and resources on overhead compared to actually transferring data. What if we disabled SSL and used unencrypted HTTP instead?
Now we get increased performance all the way up 128 threads – and we actually end up pushing 200% as much data as we did using HTTPS! For small objects, HTTPS has an extremely high cost – you should avoid it if you can.
Number of threads – finding the sweet spot
Take a look at this graph, showing the results for object sizes 1KB – 128KB:
Ignoring minor deviances, all of the objects seem to peak at 64 connections. Any more than that either causes a significant drop off, or just minor variance. For objects less than 128KB, 64 threads definitely seem to be the cut-off point. Compare it with the following graph, showing object sizes 256KB – 2048KB:
For these objects, we clearly see that going up to 128 connections actually provide a boost in throughput, leading me to conclude that for objects of size 256KB+, you can use somewhat more threads successfully.
For all object sizes, using HTTP over HTTPS seems to increase the maximum throughput thread limit – this increasing it from 64 to 128 for smaller objects and from 128 to 256 threads for larger objects. If you’re uploading objects of varying sizes, this means you’ll have to do some testing with your specific workload to find out the optimal amount of threads.
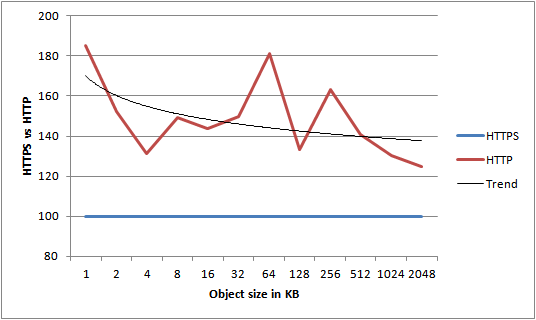
Object size vs. HTTPS performance impact
In the following graph I’ve calculated the average gain HTTP had over HTTPS for each object size, across all thread counts. As there is quite some variance, the trend line is the most interesting part of the graph. It clearly shows that as object size grows, the HTTP over HTTPS advantage decreases.
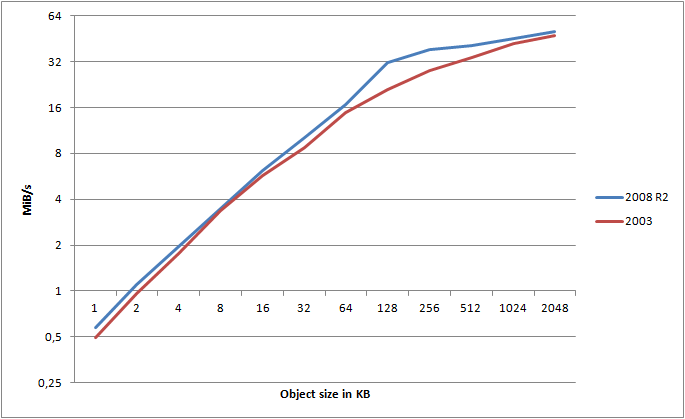
Server 2008 R2 vs. Server 2003
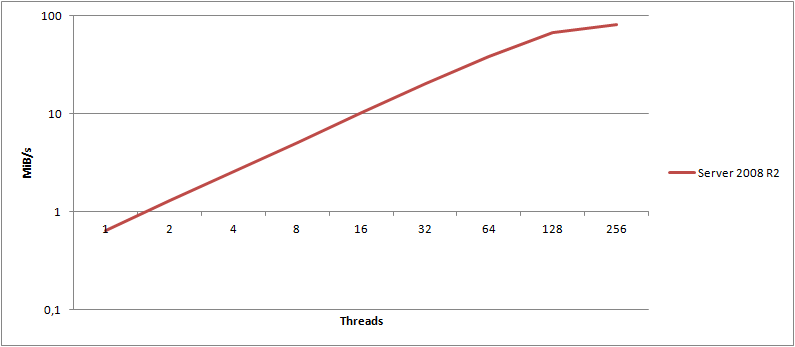
You’ve probably heard about Server 2008 bringing along a bunch of updates to the TCP/IP stack. I thought it would be interesting to run the same tests on an identical server, just running Windows Server 2008 R2 x64. Luckily, I have just that. A server with identical hardware, on the same subnet at the same ISP, just running Server 2008 R2 x64 instead. Question is, how big of a difference does the OS alone make?
For this graph, I calculated the maximum attainable transfer speed, using HTTPS, for a given object, across any number of threads. I’ve then mapped those values into the graph for both Server 2003 and Server 2008 R2 (note the log(2) scale!).
It clearly shows that Server 2008 R2 consistently wins out over 2003 - and this is using the exact same hardware, same switches, connection, etc. - only the OS is different. What about HTTP?
Ignoring some minor variance, HTTP is still clearly the winner.
On average, I found Server 2008 R2 to be 16.8% faster than Server 2003 when testing HTTPS, and 18.7% faster when using HTTP. That is a major gain just by changing the OS!
The impact of locality – EC2 meets S3
At this point I’ve demonstrated that you get rather crappy performance if you perform your uploads single threaded. By just scaling out the number of threads, we can actually end up saturating a gigabit NIC, provided the object size is large enough. However, we do spend a large amount of time waiting for network latency. What difference would it make if we were to run this in the cloud… Say in EC2 for example?
I spawned an m1.xlarge instance in the EU EC2 region, providing me with a stable instance with plenty of CPU and memory. A tracert confirms that we are indeed very close to the S3 servers:
Tracing route to s3-eu-west-1.amazonaws.com [178.236.5.31]
over a maximum of 30 hops:
1 <1 ms <1 ms <1 ms ip-10-48-248-2.eu-west-1.compute.internal [10.48.248.2]
2 <1 ms <1 ms <1 ms ec2-79-125-0-242.eu-west-1.compute.amazonaws.com [79.125.0.242]
3 <1 ms <1 ms <1 ms ip-10-1-44-253.eu-west-1.compute.internal [10.1.44.253]
41 ms 2 ms 1 ms ip-10-1-0-5.eu-west-1.compute.internal [10.1.0.5]
5 <1 ms <1 ms <1 ms ec2-79-125-1-97.eu-west-1.compute.amazonaws.com [79.125.1.97]
62 ms 2 ms 2 ms 178.236.0.13872 ms 20 ms 2 ms 178.236.0.12382 ms 2 ms 2 ms 178.236.0.15592 ms 2 ms 2 ms 178.236.5.31
HTTP still wins out over HTTPS
Just to make sure, I compared the average performance of HTTP over HTTPS again. For now, I’m hiding the actual units, and instead I’m just showing the percentage difference. Note that the blue HTTPS line is a baseline performance of 100%.
Ignoring variation, we see an average performance improvement of almost 150% compared to HTTPS. From this we can conclude that locality doesn’t change the performance characteristics of HTTP vs. HTTPS – HTTP still wins any day. As a result of this, numbers from now on will be based on HTTP tests, unless explicitly stated otherwise.
Now we’re talking throughput!
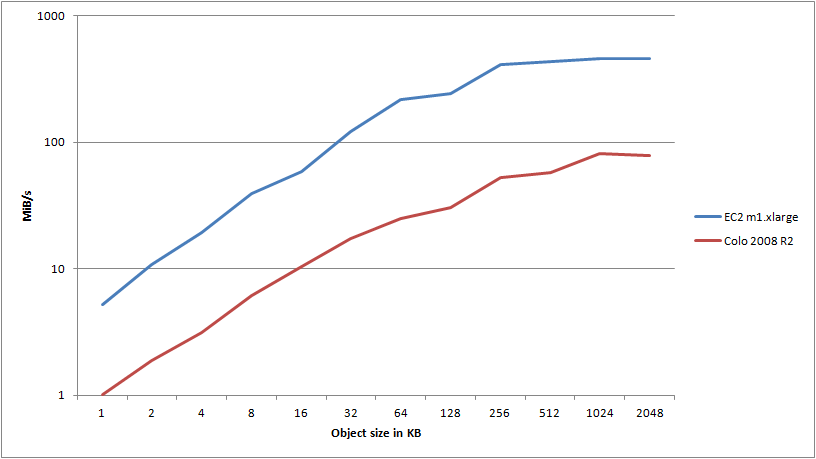
Let’s look at a quick graph detailing the maximum attainable transfer speeds for any given object, comparing my colo Server 2008 R2 server with the m1.xlarge instance run in the AWS EC2 cloud (note the log(10) scale):
Wow. I redid this test several times as I just couldn’t believe the results. Where my 2008 R2 instance pushed about 1 meg/sec, I was getting 5.2 megs/sec through the EC2 instance. Okay, I guess that’s reasonable since the smaller objects are punished so severely by connection overhead - and that’s the primary advantage of having close locality to the S3 servers, right?
However - once we get to object size 32, we’re now pushing 120 megs/sec from EC2 - at the very border of the 100Mbps NIC that the server reports. But it doesn’t stop there - oh no. I ended up hitting the ceiling at a stable transfer speed of 460 megs/sec, pushing 1024KB objects using 64 threads. But how in the world am I able to push 3,680Mbps through a 100Mbps NIC?
The thing is, these are all just virtual machines sharing physical hardware. The server itself reports 100Mbps, but Amazon will scale your NIC depending on the instance type - typically telling you to expect a worst case of 250Mbps on a large instance. My guess is that these machines are running 10gige internally, and you’ll get whatever is available, though QoS’ed so you’ll get your 250Mbps at a minimum. If that is the case, I can easily pull 3,680Mbps of the theoretically available 10,000Mbps, the rest being used by other VPCs on the same physical network. To all my neighbors during these tests, sorry!
This begs the question though - what if I had that 10gige connection all by myself? What if I didn’t have to share it?
Pushing the limits using compute clusters
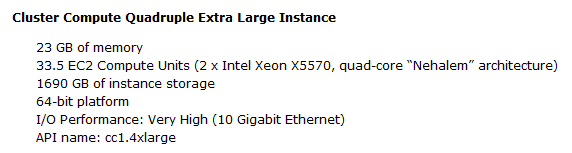
If we take a look at the Cluster Compute Quadruple Extra Large Instance (let’s just call it CC from now on) specs, we’re told to expect 10gige network connectivity:
Aha! Just what we need. Unfortunately the CC instances are only available in the US regions, so I had to setup a new bucket in the US, and change my test code to connect to said bucket, from the US. As such, it shouldn’t change anything, though it should be noted that the tests so far have been run in the Dublin DC, whereas this test is run in the North Virginia DC.
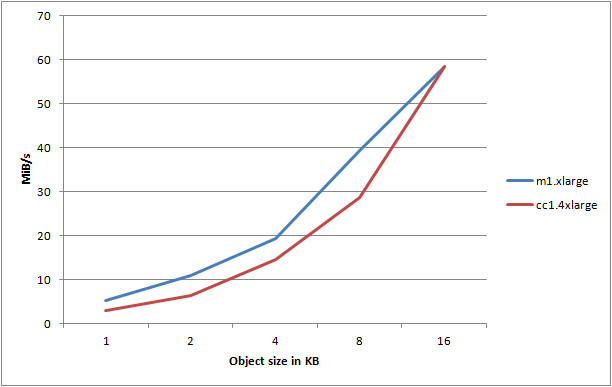
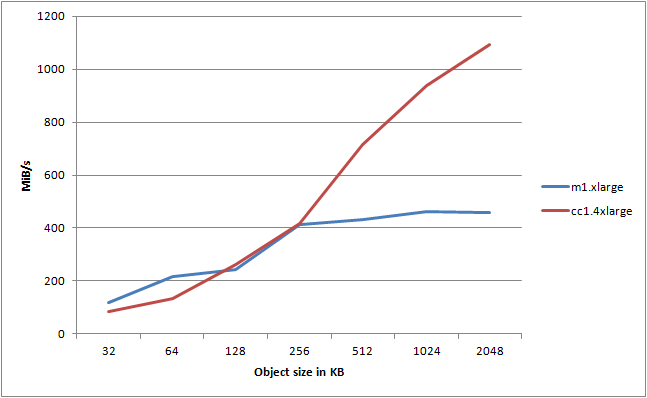
Let’s start out by looking at object sizes 1-16KB, comparing the m1.xlarge instance with the cc1.4xlarge instance:
Huh, that’s kinda disappointing. It seems that the CC instance consistently performs worse than the m1.xlarge instance. Let’s try and take a look at object sizes 32-2048KB:
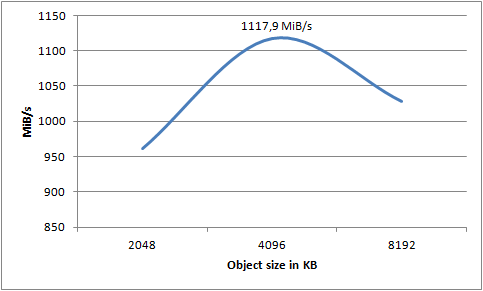
Now we’re talking! As soon as we cross 256KB in object size, we start to saturate the available fabric speed of the m1.xlarge instance - the CC instance on the other hand, it just keeps going up! In this test I reached a max speed of 1091,7 megs/sec using 128 threads pushing objects of 2048KB. That’s 8,733.6Mbps out of a theoretical max of 10,000Mbps - on a single virtualized instance, mind you.
To infinity and beyond
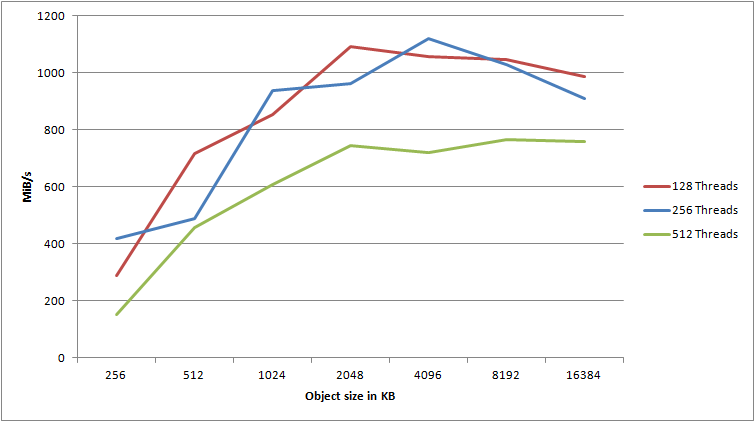
Still not satisfied? Well, neither was I. I tried to tweak the settings a bit more to see if I could push it even further. Given that an object size of 2048KB seemed to improve the result over 1024KB, would an even larger object help? How about more than 128 threads?
It’s evident that more than 256 threads does not yield any benefit, quite the contrary. However, using 256 threads and an object size of 4096KB, I was able to push 1117,9 megs/sec to S3. I am extremely satisfied with that result. I honestly did not expect to even get 25% of that from a single machine, whether physical or virtual. That’s 8,943,2Mbps of pure data - that is, not including the inevitable network overhead.
Expanding on the results
You can download an Excel sheet of all my raw data, including the various graphs and calculations that I’ve made. Note that all raw numbers are repeated, first sorted by the number of threads, then sorted by the object size. Note also that there are some extra data here and there where I had to do some adhoc tests.
If you want me to create some graphs of a specific scenario, compare two different result sets, environments, etc. - just let me know in the comments. I’ve probably overlooked something interesting as there is just so much data to pull out. Optimally I’d want to run each of these tests for 100 repetitions at different times of the day, just to weed out all of the variance completely. Unfortunately, that would cost me way too much, and it would take ages. I may do some high-rep tests for specific scenarios like the HTTP vs. HTTPS tests as I feel there were too many fluctuations there.
There are a lot of factors to consider when optimizing for upload speed. However, there are just a few rules that you need to follow to reach near-optimal speed with limited effort.
Parallelization
The easiest way to scale is to just parallelize your workload. Each S3 connection doesn’t get that much bandwidth through, but as long as you run many of them at the same time, the aggregate throughput is excellent. Most workloads showed 64, 128 or 256 to be the optimal number of threads.
Locality & bandwidth
Being close to the S3 bucket servers is of utmost importance. As can be seen from the graph, I almost exhausted my 1gige NIC on my colo servers, but I doubt I’d be able to exhaust a 10gige connection (anyone got a server I can borrow for testing?). The graph is slightly misleading though as the EC2 servers had anywhere from 4gige to 10gige of connectivity, so it’s not all just latency - bandwidth certainly matters too, especially once you reach high amounts of thread with large object sizes.
Operating system
Now, you shouldn’t go out and format all of your Server 2003 servers just to get 2008 R2. However, 2008 R2 does consistently perform better than 2003. Though I haven’t tested it, I expect 2008 and 2008 R2 to be about the same. Generally you’ll get about 15% better performance on a 2008 R2 server over a 2003 server.
Saturating the S3 service
Not going to happen, simple as that. I’m utterly amazed at the throughput I managed to gain from just a single machine. At the top, I was pushing more than one gigabyte of data to S3 every second - 1117,9 megs/sec to be precise. That is an awful lot of data, all coming from a single machine. Now imagine you scale this out over multiple machines, and you have the network infrastructure to support it - you can really send a lot of data.
Variance
As can be seen in some of my results, you can’t avoid running into variance when using a cloud service. However, it’s important to look at the baseline numbers - what is the worst case performance you can expect? Not only did my best-case numbers blow my mind, so did the worst-case numbers! Even though performance does fluctuate, the median performance is what matters, and it’s nothing short of impressive.
Optimizing the network stack
I’m certain I’ve left out some percentages by not looking at the NIC drivers and settings. However, generally that’ll be your very last resort, and it’ll only help you get those last few percentages. In most cases there’s no reason to mess around with the remaining 1%, I’ll easily settle for the 99%.
Imagine the scenario – you’ve got customers all over the world all requesting binary files from you. To speed up your delivery, you want to utilize a CDN. Furthermore, all of the files needs to be protected on a specific user session level. Basically, you need to grant access to the specific file when a given user logs in – it’s not enough just to have a “hidden” URL or a URL with an infinitely sharable policy in the query string.
To do this, we’ll need to set up a private S3 bucket, a private CloudFront distribution, a bucket policy on said bucket so CloudFront is able to access the data, and finally we need to generate signed policies for the users on the fly, so they may retrieve the files using CloudFront.
To keep this post simple (relatively speaking), I’ll assume you’ve got a completely empty AWS account with access to S3 and CloudFront. Don’t worry if you’ve got existing content, you’ll just need to modify the scripts slightly to access the right objects (as I’m assuming an empty account, I’ll just access the first element here and there, instead of the specific one).
Why you don’t want to rely on third party GUIs
Admittedly, I used Bucket Explorer to begin with, to help me set up access identities and private distributions. However, as soon as I had a need that Bucket Explorer couldn’t help me with, or I had hiccups, I was totally lost. If you rely on third party GUIs to do the setup for you, you have very limited understanding of what’s actually being set up beneath the covers, and as such, you’ll be in a pickle when (no, not if!) something goes awry. Once you’ve done the setup by hand, you may later start using tools, but only if you understand what they’re doing.
Note that this is not a bash on Bucket Explorer, just my opinion never to use tooling before you understand what they do, just as I wouldn’t recommend you use TortoiseGit before you know the command line by heart.
The AWS console only takes you so far
While the AWS console is great in itself, it’s really only meant for the simplest of tasks. Very quickly you’ll find yourself limited by what you can do. For what we’re about to do, all you’d be able to do through the console GUI is to create a bucket, the rest would have to be done through code. To keep things consistent, I’m sticking to code for all tasks.
using System;
using Amazon;
using Amazon.CloudFront.Model;
using Amazon.S3;
using Amazon.S3.Model;
namespace AWSTest
{
class Program
{
privatestaticstring accessKeyID = "AKI...";
privatestaticstring secretAccessKey = "w49...";
staticvoid Main()
{
}
}
}
Make sure to insert your own access key ID and secret access key values. All code samples posted from now on should go into the Main() method body.
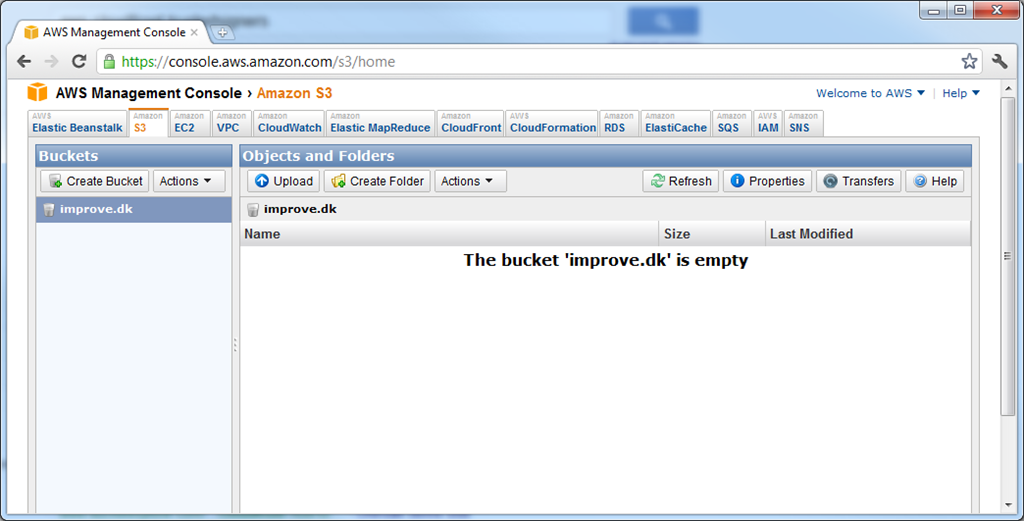
Creating the private bucket
Run the following code to set up a bucket, which will be private by default. Make sure you define a unique bucket name, I’m using the name improve.dk for this sample. Note that if your bucket is not in the EU region, you’ll need to substitute my ServiceURL with the one for your region. You can find all the service URLs here: http://docs.amazonwebservices.com/general/latest/gr/index.html?rande.html
var config = new AmazonS3Config()
	.WithServiceURL("s3-eu-west-1.amazonaws.com");

using (var s3Client = AWSClientFactory.CreateAmazonS3Client(accessKeyID, secretAccessKey, config))
{
	var request = new PutBucketRequest()
		.WithBucketName("improve.dk")
		.WithBucketRegion(S3Region.EU);

	var response = s3Client.PutBucket(request);
}
If all goes well, you should see your bucket in the AWS console immediately hereafter:
Creating a CloudFront Origin Access Identity
Now that we’ve got our bucket, we need to create the private CloudFront distribution. However, we also need to concoct a way for the private distribution to gain access to our private bucket. We can do so by utilizing a special type of CloudFront identities called Origin Access Identities, which I’ll be referring to as OAI’s.
Creating an OAI allows us to tell CloudFront to access the S3 bucket using that OAI. On the bucket side, we can then create a policy granting access to that specific OAI, and thus enabling our private distribution access to our private bucket.
Run the following code:
using (var cfClient = AWSClientFactory.CreateAmazonCloudFrontClient(accessKeyID, secretAccessKey))
{
	var oaiConfig = new CloudFrontOriginAccessIdentityConfig()
		.WithComment("OAI used for private distribution access to improve.dk bucket.");

	var request = new CreateOriginAccessIdentityRequest();
	request.OriginAccessIdentityConfig = oaiConfig;

	var response = cfClient.CreateOriginAccessIdentity(request);
	Console.WriteLine(response.OriginAccessIdentity.Id);
	Console.WriteLine(response.OriginAccessIdentity.S3CanonicalUserId);
}
This creates a new OAI with a comment. Furthermore it prints out two bits of information that we’ll need shortly – the OAI ID and the OAI S3 canonical user ID. These are two different ways of identifying the OAI, and we’ll need both, so make sure to jot them down.
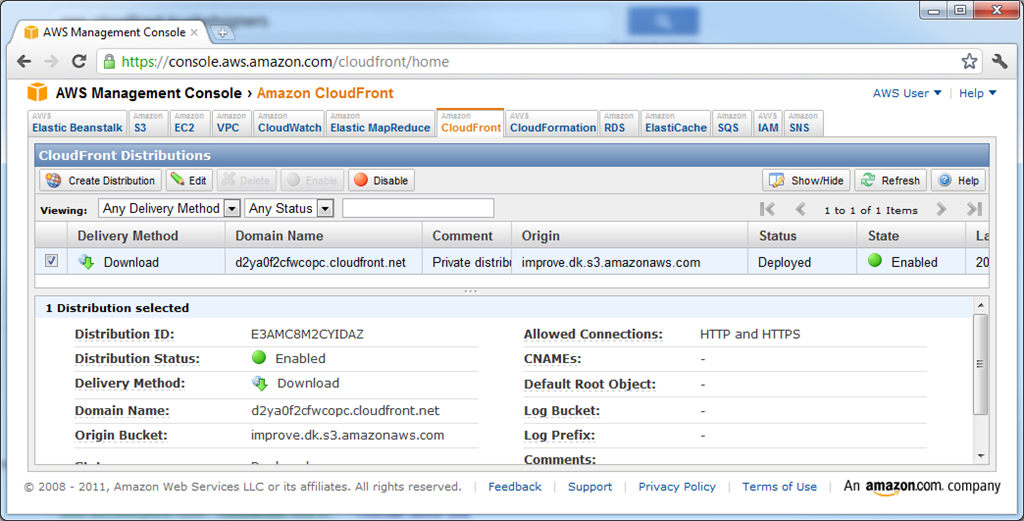
Creating the private CloudFront distribution
Now that we have our bucket and OAI, we can set up a private CloudFront distribution and point it at the S3 bucket.
Run the following code:
using (var cfClient = AWSClientFactory.CreateAmazonCloudFrontClient(accessKeyID, secretAccessKey))
{
	var oaiIdentity = cfClient.ListOriginAccessIdentities().OriginAccessIdentities[0];

	var distributionConfig = new CloudFrontDistributionConfig();
	distributionConfig.S3Origin = new S3Origin("improve.dk.s3.amazonaws.com", oaiIdentity);
	distributionConfig.Comment = "Private distribution for accessing the improve.dk bucket.";
	distributionConfig.Enabled = true;
	distributionConfig.TrustedSigners = new UrlTrustedSigners().WithEnableSelf(true);

	var request = new CreateDistributionRequest();
	request.DistributionConfig = distributionConfig;

	var response = cfClient.CreateDistribution(request);
}
This starts out by fetching the OAI we created just before. It then creates a new distribution configuration, specifying the improve.dk S3 bucket as the source, using the OAI for authentication. The TrustedSigners parameter determines who will be able to sign (and thereby grant access) to the distribution later on. For this demo, we’ll just grant access to our own AWS account. You may grant access to up to 5 other AWS accounts, should you so wish.
Once run, you should immediately see your distribution being in the InProgress state in the AWS console. This picture is taken approximately 10 minutes later, when the distribution enters the Deployed state:
Setting up a bucket policy to grant our OAI access to the S3 bucket
When we upload objects to our bucket, we could grant access to the OAI on each specific object. That will require an extra request for each upload though, as we can’t assign ACL’s at the same time as we create objects. It would also be a major hassle if we ever were to change our OAI/distribution. To make it easier, we can create a bucket wide policy that grants access to all the objects in the bucket, for one specific OAI.
Open up the AWS Policy Generator tool in a new window. Make sure to select the S3 Bucket Policy type. In the Principal field, enter the S3 canonical user ID of the OAI we created earlier. For actions, only select the GetObject action – this allows the distribution to retrieve an object and nothing more. For the ARN, use this, though with your own bucket name:
arn:aws:s3:::improve.dk/*
That ARN will ensure the policy covers all objects in the bucket, no matter their name. Now click the Add Statement button, followed by the Generate Policy button. What you’ll end up with is a JSON based policy like this:
Now that we have the policy ready, we need to add it to our bucket. Run the following code:
var config = new AmazonS3Config()
	.WithServiceURL("s3-eu-west-1.amazonaws.com");

using (var s3Client = AWSClientFactory.CreateAmazonS3Client(accessKeyID, secretAccessKey, config))
{
	var request = new PutBucketPolicyRequest();
	request.BucketName = "improve.dk";
	request.Policy = "{ "Id": "Policy1319566876317", "Statement": [ { "Sid": "Stmt1319566860498", " +
		""Action": [ "s3:GetObject" ], "Effect": "Allow", "Resource": "arn:aws:s3:::improve.dk/*", " +
		""Principal": { "CanonicalUser": [ "7d76be60a0acc160399f6d6750bdc9d4d78d16a58a30987844d4df010f2ded483a9e73b8b0877089fab75f5d0b591dee" ] } } ] }";

	var response = s3Client.PutBucketPolicy(request);
}
Make sure you escape your policy properly. There’s no need to concatenate it over multiple lines, I just did so only to avoid too much website distortion when displayed here.
Uploading a test object
To test everything out, we need to have a test object in our bucket. It can be anything, though an image is probably the easiest to test with. I used this little dapper AWS logo:
Run the following code to upload the object:
var config = new AmazonS3Config()
	.WithServiceURL("s3-eu-west-1.amazonaws.com");

using (var s3Client = AWSClientFactory.CreateAmazonS3Client(accessKeyID, secretAccessKey, config))
{
	var request = new PutObjectRequest()
		.WithFilePath(@"C:logo_aws.gif")
		.WithBucketName("improve.dk");

	var response = s3Client.PutObject(request);
}
Make sure to substitute with your own bucket name as well as the correct path for whatever test file you’re using. Immediately after running this you should see the file in your bucket:
If you enter the properties of the object, you’ll see a link like this:
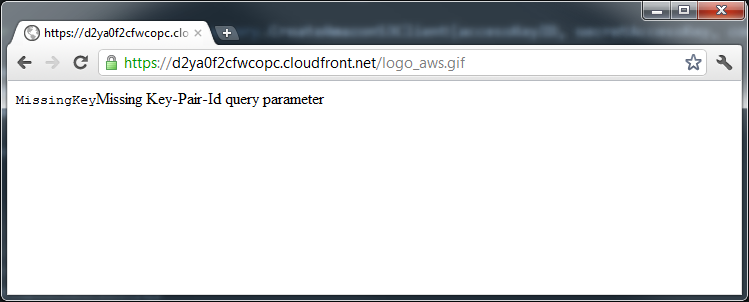
If you try to access the URL directly, you should get an error like this:
This is expected, given that our bucket is private and we’re currently accessing the object directly from the bucket. If you go back to your distribution, you’ll see a domain name like d2ya0f2cfwcopc.cloudfront.net. Try substituting the S3 domain name with the one of your distribution, like so:
Accessing the distribution URL doesn’t help however:
Once again we’re not allowed access. This time not due to S3 policies, but due to the distribution being private and thus requiring signed URLs.
Creating a time limited signed URL for a given object
Now that we have the URL of our distribution object, we need to sign it with a policy granting access to it for a given time period. To do the signing, I’ve create a class based on Gael Fraiteurs post on Stack Overflow. His class deals with canned policies, whereas this one deals with custom policies as they’re a bit more dynamic, configurable and thereby powerful.
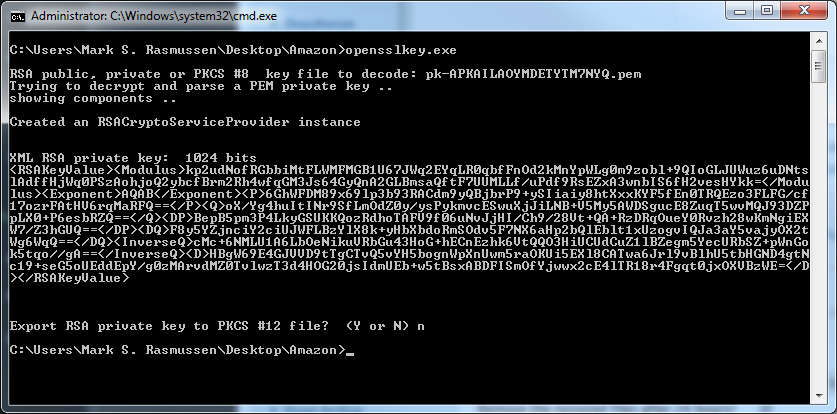
Before we can use it though, we need a CloudFront key pair. Go to the Access Credentials section of the Security Credentials section of the AWS console, click on the Key Pairs pane, and then click “Create a New Key Pair”. If successful, a key pair should have been created, and the private part of the key should have been downloaded as a .pem file automatically:
Make sure to save the .pem file as it cannot be recreated. If you loose it, you’ll have to create a new key pair. Note that these credentials have nothing to do with your access key ID & secret key – those are a completely separate set of keys. Before we can use the .pem secret key, we need to transform it into an XML format that RSACryptoServiceProvider can parse. Go to http://www.jensign.com/opensslkey/ and download the opensslkey.exe application – save it in the same directory as your .pem file. If you don’t like running the .exe, the source code is available for you to compile and run yourself.
Run opensslkey.exe and give it the name of your .pem file like so:
Creating the actual signed URL
One way or the other, copy that bit of XML. Now run the following code, substituting my CloudFront key pair and object URL with your own:
Note how we instantiate the CloudFrontSecurityProvider, passing in the CloudFront key pair ID and secret key. We then give it the complete URL of the file we want, including a time limit for when it should no longer be available – 5 minutes in this case. For the sake of simplicity, I’m automatically copying the URL to the clipboard so I can easily paste it into my browser and test it. In my case, my complete URL looks like this:
By the time you read this, hopefully, the link should no longer be working. If you upload another file (IMAG0655.jpg in my case) and just substitute the filename, using the same policy, you’ll get the following error:
Using wildcards when signing URLs
So what if you want to grant access to many files at once, do we have to create a policy for each single one? Thankfully, no, we don’t! Say you want to grant access to all files in the folder “Test” (and remember, there is no such thing as folders in S3 – just objects named e.g. /Test/FileName.jpg). What we’d do is to create a policy like this:
var signedUrl = provider.GetCustomUrl("https://d2ya0f2cfwcopc.cloudfront.net/Test/*", DateTime.Now.AddMinutes(5));
That’s right, we can create custom policies for wildcard URLs too! Once you’ve got this URL, just substitute the asterisk for whatever file you want to request:
All using the same policy, just with a different file paths.
Limiting the users IP address
At this point we’ve created a URL with a custom signed policy that grants access to a given resource (or wildcard) within a limited time period. However, within this period, the user may distribute the URL to anyone else, who will then also be able to access the resource. To hinder this, we can add the source IP address as an additional condition to the policy!
Add an overload to the GetCustomUrl function in the CloudFrontSecurityProvider class like so:
To use it, we just pass in an IP address in the CIDR format:
var signedUrl = provider.GetCustomUrl("https://d2ya0f2cfwcopc.cloudfront.net/D.jpg", DateTime.Now.AddMinutes(5), "212.242.193.110/32");
The above example would provide access to the D.jpg object for 5 minutes, but only for the 212.242.193.110 IP address specifically. We could grant access to a whole subnet by passing in the IP/CIDR 212.242.193.0/24, etc.
You can only use the date and source IP address for conditions, contrary to other AWS policies that allow a plethora of conditions. For a full description, see page 80+ in this document: http://awsdocs.s3.amazonaws.com/CF/latest/cf_dg.pdf
Conclusion
This seems way more complex than it… Who am I kidding? This IS complex to set up! However, at this point, you can upload any number of objects to your bucket, and you never have to consider object-level ACLs as it’s all handled by the bucket policy. You can also create any number of custom policies for your URLs using your private distribution, limiting both the time period in which the link is valid, as well as the source IP address. Once all of this is setup, it’s rather easy to use.
Utilizing private S3 buckets and private CloudFront distributions, we can now secure our content completely while having very fine grained control over who gets access. All this while we still utilize the CloudFront CDN to deliver the content from the destination nearest to the end user.
PS – before you remind me the remove them – all keys, user identities etc. have all been inactivated/removed.
One of the latest features I’ve added to OrcaMDF is support of databases with multiple data files. This required relatively little parsing changes, actually it was mostly bug fixing code that wasn’t hit previously, due to only working with single file databases. It did however require some major refactoring to move away from MdfFile being the primary entrypoint, to now using the Database class, encapsulating a variable number of DataFiles.
Proportional fill allocation
OrcaMDF supports the standard proportional fill allocation scheme where a table is created in the database, being bound to the default PRIMARY filegroup containing all the data files. As an example, you might create the following database & schema:
CREATEDATABASE
[SampleDatabase]
ONPRIMARY
(
NAME = N'SampleDatabase_Data1',
FILENAME = N'C:SampleDatabase_Data1.mdf',
SIZE = 3072KB,
FILEGROWTH = 1024KB
),
(
NAME = N'SampleDatabase_Data2',
FILENAME = N'C:SampleDatabase_Data2.ndf',
SIZE = 3072KB,
FILEGROWTH = 1024KB
),
(
NAME = N'SampleDatabase_Data3',
FILENAME = N'C:SampleDatabase_Data3.ndf',
SIZE = 3072KB,
FILEGROWTH = 1024KB
)
LOG ON
(
NAME = N'SampleDatabase_log',
FILENAME = N'C:SampleDatabase_log.ldf',
SIZE = 3072KB,
FILEGROWTH = 10%
)
GO
USE SampleDatabase
GOCREATETABLE MyTable
(
A intidentity,
B uniqueidentifier default(newid()),
C char(6000)
)
GOINSERTINTO MyTable DEFAULTVALUESGO100
This would cause MyTable to be proportionally allocated between the three data files (the C column being used for the fill to require 100 pages of storage – to ensure we hit all three data files). And to parse it, all you’d do is the following:
var files = new[]
    {
		@"C:SampleDatabase_Data1.mdf",
		@"C:SampleDatabase_Data2.ndf",
		@"C:SampleDatabase_Data3.ndf"
    };

using (var db = new Database(files))
{
	var scanner = new DataScanner(db);
	var result = scanner.ScanTable("MyTable");

	EntityPrinter.Print(result);
}
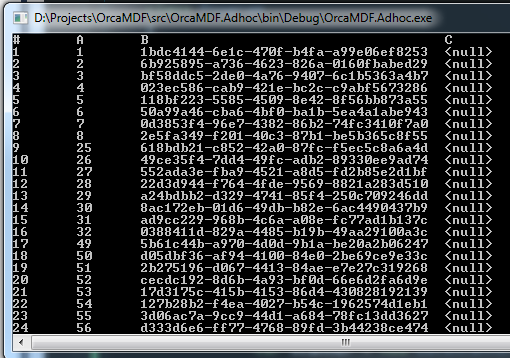
And when run, you’ll see this:
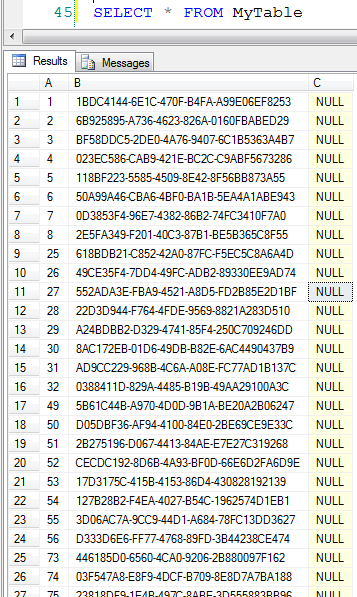
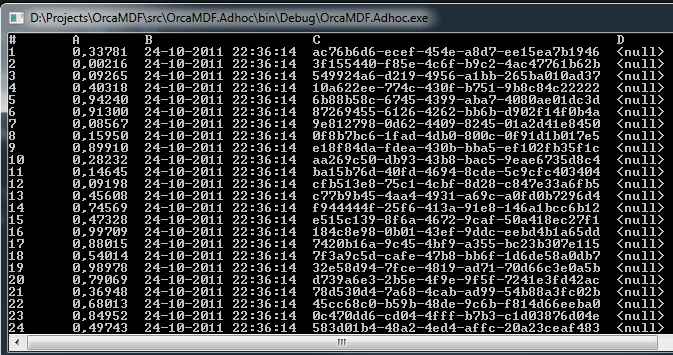
All the way down to 100. Notice how the A column identity value is jumping – this is due to the fact that we’re allocating one extent per data file in round robin fashion. ID’s 1-8 in the first data file, 9-16 in the second data file and finally 17-24 in the third data file. At this point pages 25-32 are allocated in the first data file again, and so on. Since it’s a heap, we’re scanning these in allocation order – by file. That causes us to get results 1-8, 25-32, 49-56, 73-80 and finally 97-100 all from the first file first, and then 9-16, 33-40, etc. from the second and finally the remaining pages from the third data file. Think that looks weird? Well, it’s exactly the same for SQL Server:
Filegroup support
OrcaMDF also supports the use of filegroups, including proportional fill allocation within a specific filegroup. As an example, you might create the following database & schema:
CREATEDATABASE
[SampleDatabase]
ONPRIMARY
(
NAME = N'SampleDatabase_Data1',
FILENAME = N'C:SampleDatabase_Data1.mdf',
SIZE = 3072KB,
FILEGROWTH = 1024KB
)
LOG ON
(
NAME = N'SampleDatabase_log',
FILENAME = N'C:SampleDatabase_log.ldf',
SIZE = 3072KB,
FILEGROWTH = 10%
)
GOALTERDATABASE
[SampleDatabase]
ADD FILEGROUP
[SecondFilegroup]
GOALTERDATABASE
[SampleDatabase]
ADD FILE
(
NAME = N'SampleDatabase_Data2',
FILENAME = N'C:SampleDatabase_Data2.ndf',
SIZE = 3072KB,
FILEGROWTH = 1024KB
),
(
NAME = N'SampleDatabase_Data3',
FILENAME = N'C:SampleDatabase_Data3.ndf',
SIZE = 3072KB,
FILEGROWTH = 1024KB
)
TO FILEGROUP
[SecondFilegroup]
GO
USE SampleDatabase
GOCREATETABLE MyTable
(
A floatdefault(rand()),
B datetime default(getdate()),
C uniqueidentifier default(newid()),
D char(5000)
) ON [SecondFilegroup]
GOINSERTINTO MyTable DEFAULTVALUESGO100
This would cause MyTable to be proportionally allocated in the second and third datafile (the D column being used for fill to require 100 pages of storage – to ensure we hit both data files in the filegroup), while the primary data file is left untouched. To parse it, you’d do the exact same as in the previous example, and the result would be: